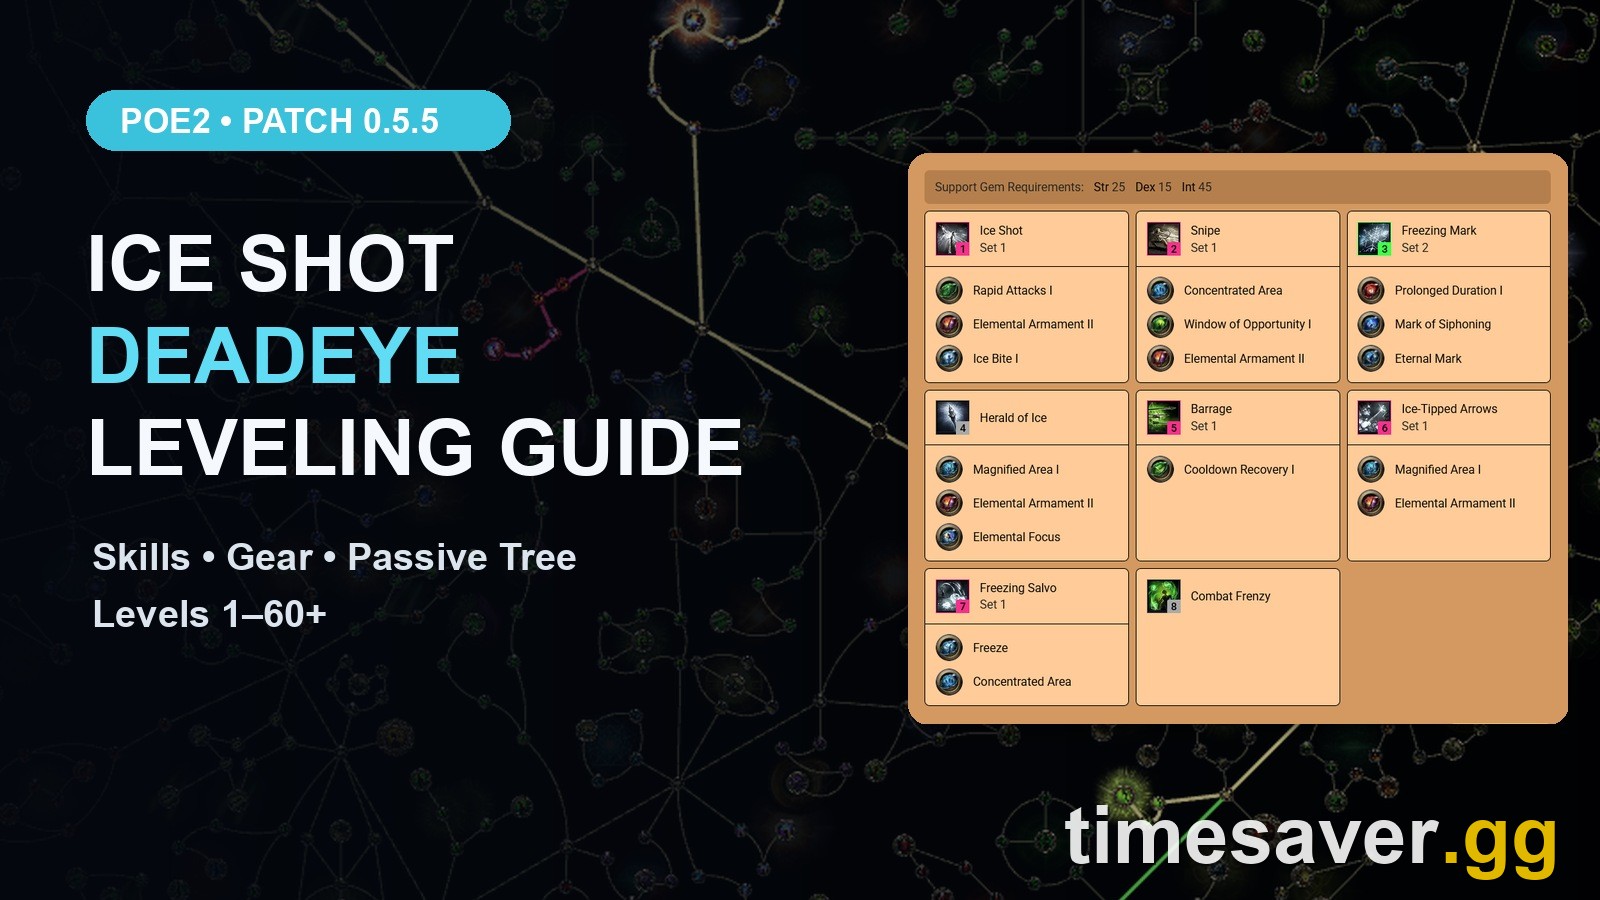
Written for 0.5.5 "Forbidden Rites," live September 4, 2026 at 1 PM PDT / 20:00 UTC (last verified 2026-09-04). The 0.5.5 patch notes contain no skill, support gem, passive tree or Ascendancy balance section at all — the update is league mechanics, Ritual, Trial of Chaos and endgame — so everything below is equally valid in the Runes of Aldur league, which keeps running alongside Forbidden Rites until 1.0.
Quick answer: You cannot actually play Ice Shot until character level 31, so this leveling guide is really two builds stapled together. Levels 1–30 you run Lightning Arrow + Lightning Rod with Frost Bomb and Herald of Thunder. At level 31 you swap Lightning Arrow for Ice Shot and Herald of Thunder for Herald of Ice, and the build locks into its final shape: Freezing Mark → freeze the boss → Barrage → perfect-window Snipe. Your bow upgrades land at levels 11 (Warden Bow), 16 (Recurve Bow), 33 (Cultist / Dualstring Bow) and 45 (Artillery Bow), and your Ascendancy order is Point Blank → Endless Munitions → Gathering Winds. Save your first Lesser Jeweller's Orb for Snipe and your second for Ice Shot.
Most bow leveling guides quietly skip the awkward truth about this archetype: the skill in the title is unavailable for the entire first third of the campaign. Ice Shot is a Bow Tier 9 gem, which means a level 9 Uncut Skill Gem and a character level requirement of 31 — you will be deep into Act 3 before you press it once. That is not a flaw in the build, it is just the shape of it, and planning around it is the whole game. Everything you do before level 31 is really about arriving at the swap with the right gems, the right currency saved and a bow good enough to carry you to Act 4.
This guide walks the full campaign in the same level brackets the build actually changes in, with the exact gem order, the crafting breakpoints for every bow, the Ascendancy path, the boss rotation, and which campaign and league-mechanic rewards are worth detouring for. When you finish the campaign, stop using it — swap to a proper mapping setup. Our PoE2 best builds tier list covers the endgame build options worth graduating into; it is a general tier list rather than a dedicated Ice Shot endgame guide, so treat it as a shortlist of where to go next, not a copy-paste import.
If you are starting the event fresh, the Forbidden Rites league start guide covers what to farm and buy in the first 48 hours, and the 0.5.5 release date breakdown has the full launch timetable.

PoE2 - Divine & Exalted Orbs
Skip the grind — get Divine & Exalted Orbs
General gear priorities
Bow leveling in PoE2 lives and dies on flat added damage. Percentage modifiers scale a small number early; flat damage on your quiver, gloves and rings is what makes Acts 1 and 2 feel fast.
- Quiver — the single best non-weapon slot. Look for +levels to skills and a high flat damage roll. The base itself barely matters.
- Gloves — check the town vendor every one to two levels purely for flat damage. Every point counts through Act 2.
- Boots — Movement Speed or nothing. Once you have a pair with Movement Speed, never replace it with a pair without it, no matter how good the other affixes look.
- Chest and other slots — Evasion or Evasion/Energy Shield hybrid bases are ideal, but early on just wear whatever has the highest useful stats.
- Helmet, Belt, Amulet — your attribute slots. Strength on the belt, Dexterity or Intelligence on the helmet. Gem requirements will bite you around the level 31 swap, so fix them here.
- Life and Resistances — your entire defensive plan for the campaign. Do not overthink it.
Two habits matter more than any individual drop. Salvage every weapon with Quality for Blacksmith's Whetstones, and salvage every item with Sockets for Artificer's Orbs — those two materials fund every gear upgrade you make. And vendor your rares for Gold rather than hoarding them, so you can gamble for upgrades from the vendor in Act 3 and Act 4.
Levels 1–14: Lightning Arrow and the Act 1 opening
Boss order
For the smoothest possible Act 1, clear in this order:
The Devourer (Mud Burrow) → Beira of the Rotten Pack (Clearfell) → Areagne, Forgotten Witch (The Grelwood) → The Rust King (Red Vale)
Beira and Areagne are optional Act 1 encounters, and both are worth the detour — Beira for the Cold Resistance reward, Areagne for the Uncut Support Gem.
Gear
Flat added damage to attacks is everything here, and it does not matter whether it is elemental or physical — take whichever gives you the higher tooltip DPS.
At level 11, pick up a Warden Bow (23 Dex). Use the highest-DPS one you drop or can buy. Critically: do not invest a single currency item into it. It is a four-level rental. Your Artificer's Orbs, Exalted Orbs, Regal Orbs and Alchemy Orbs are all being saved for the level 16 bow.
Grab a Shortbow (level 5) in Red Vale and make sure you are at least character level 5 before you challenge The Rust King. Use Orbs of Transmutation and Augmentation on every new bow and quiver you pick up — they are cheap and the upgrade is usually real.
Skills

Lightning Arrow is your main skill from level 1. Add Lightning Rod next, then Frost Bomb, and have both online before you fight The Devourer and Beira. There is a chest in Clearfell that always drops a level 1 Skill Gem, so you are not relying on luck for the third one.
Take Rapid Attacks I after killing The Devourer, and Elemental Armament I after Areagne. The early support order is:
Rapid Attacks I (Lightning Arrow) → Elemental Armament I (Lightning Arrow) → Concentrated Area (Lightning Rod) → a second Elemental Armament I
Until you have enough supports — or enough Strength to run both at once — you will need to gem-swap Elemental Armament I off Lightning Arrow and onto Lightning Rod before boss fights. This feels fiddly and it is, but it is a large chunk of your single-target damage in Act 1, so do it.
Herald of Thunder is your Spirit gem for now. You cannot use Ice Shot until 31, and by the time you can, you will have a second Spirit gem for Herald of Ice — so there is no reason to hold Spirit in reserve.
Pounce is optional mobility tech. It is a Werewolf shapeshift leap borrowed from the Primal gem pool, and it requires a Talisman equipped, which means parking a cheap low-level Talisman on your second weapon set (a low-level one keeps the Strength and Intelligence requirements trivial). You drop Pounce around mid Act 2 or Act 3 when you run out of skill slots — conveniently, before weapon set 2 gets repurposed at level 31. Skip it entirely if you would rather have fewer buttons.
Levels 15–23: the bow that carries you to Act 3
Gear
At level 16, craft a proper Recurve Bow (31 Dex). This weapon has to last until level 33, so this is where all that saved currency goes.
The process: try Transmutation and Augmentation on a few different bases. If you hit a high-tier prefix, Regal it and finish it with Exalted Orbs. If you found an Essence, use that instead of the Regal — it guarantees the mod type. The target is a six-mod Recurve Bow.
Your next real weapon jump is a Dualstring Bow (level 28) or Cultist Bow (level 33), and for those you want the base to be item level 33 before you craft, because that is what determines which affix tiers can roll. Hold Alt over the item to check its item level. If you need more gems to work with while you wait, the uncut gems farming guide covers where the reliable sources are.
General gear priorities are unchanged through this bracket.
Skills
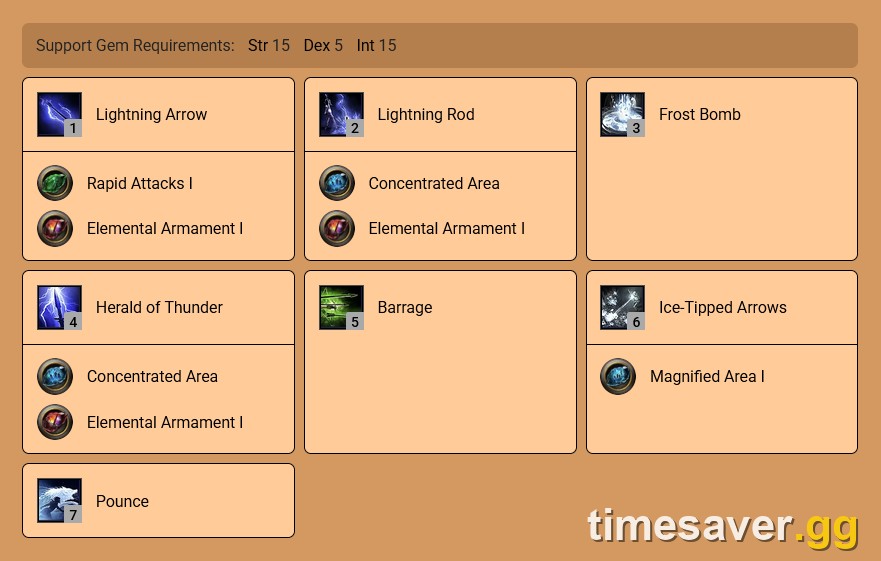
Keep Pounce if you still have a spare slot; otherwise drop it in mid Act 2 or Act 3.
One naming trap worth clearing up: Ice-Tipped Arrows is an active bow skill gem (Bow Tier 5, available at level 14), not a support gem. It readies your bow to convert physical damage to cold and trigger Ice Fragments. It is also a low priority for supports — whatever you socket into it is a small gain, so use Magnified Area I if you can afford the attributes and Elemental Armament I if you cannot. Magnified Area is the better of the two.
The important part of this bracket is what you do not spend. You are saving for a mini skill swap:
- Bank uncut Skill Gems and Support Gems instead of using them.
- Do not use any level 6 or level 7 uncut gems before the swap.
- First Lesser Jeweller's Orb → Snipe at level 24. Second Lesser Jeweller's Orb → Ice Shot at level 31.
Levels 24–30: Snipe, and prepping the Ice Shot swap
Gear
No changes. Ride the Recurve Bow to level 33. Your remaining bow milestones are item level 33 (Cultist / Dualstring Bow) and item level 46 (Artillery Bow, base requirement level 45).
Skills
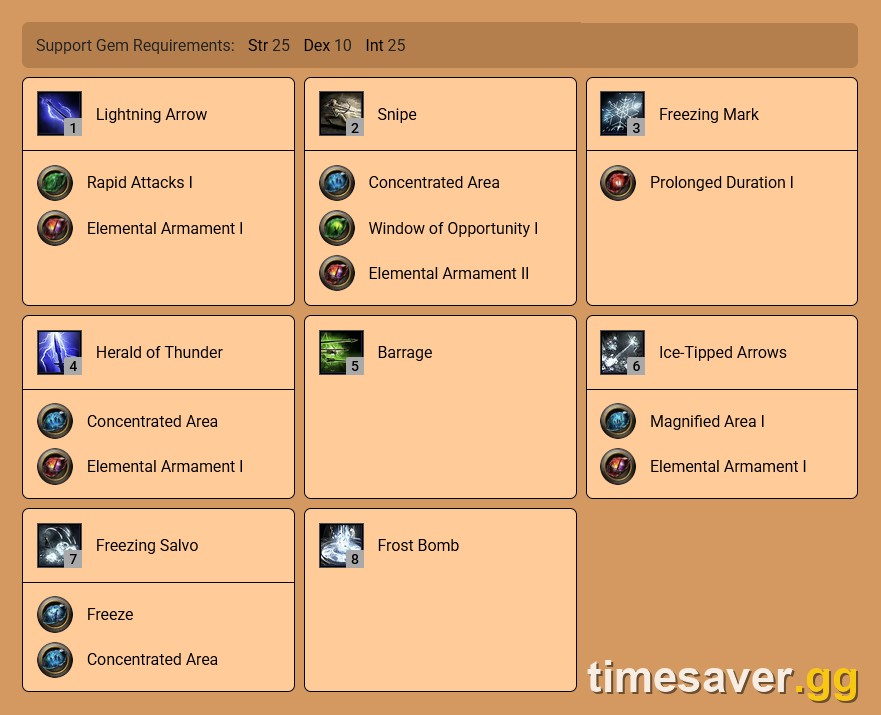
Lesser Jeweller's Orb priority: Snipe → Ice Shot → Freezing Mark → Herald of Ice Quality priority: Freezing Mark → Herald of Ice → Snipe
Snipe itself is a Bow Tier 3 gem available from character level 6 — it is not gated to 24. Level 24 is simply where it earns a slot in this build, because that is when you have the Lesser Jeweller's Orb and the supports to make it hit.
This bracket is the setup for the campaign's one real transition. At level 31 you replace Lightning Arrow with Ice Shot, and that swap needs at least three Skill Gems — one level 7 and two level 5 or 6 — plus four to five Support Gems.
The level 7 gem must be Freezing Mark. It freezes and it applies a substantial damage buff, and it is the load-bearing gem for the entire rest of the campaign. If you land a second level 7 gem, it goes to Snipe.
Keep Snipe at the highest gem level you can afford. Push Lightning Arrow to level 7 and then stop — every point past that is wasted, because it gets binned the moment a level 9 gem appears.
Frost Bomb's hidden level gate
Frost Bomb's Elemental Exposure has a monster-level cap tied to gem level:
- Level 3 — cannot apply Exposure above monster level 25
- Level 4 — cannot apply Exposure above monster level 29
- Level 5 — cannot apply Exposure above monster level 32
Note the precise wording: the cap is on Exposure only. Frost Bomb still damages, chills and freezes monsters above the cap — it just stops shredding their Cold Resistance. At gem level 5 it stays useful through Act 2. You will generally drop it in mid Act 2 or early Act 3 anyway, because your Intelligence will not keep pace with the gem levels, or simply because Snipe takes the slot.
Boss rotation (levels 24–30)
- Cast Ice-Tipped Arrows before the boss spawns.
- Cast Freezing Mark.
- Fire Lightning Arrow three or four times.
- Cast Freezing Salvo.
- If the boss is still not frozen, keep using Escape Shot or Freezing Salvo until it is.
- Once frozen: Barrage into Snipe.
For clearing, Ice-Tipped Arrows plus Freezing Mark plus Lightning Arrow is enough — Hail means Lightning Arrow freezes normal monsters on its own, which keeps the Mark buff up for free.
If you are struggling to land Snipe's perfect window, replace Window of Opportunity I with Elemental Focus and stop worrying about timing. Escape Shot can help with freeze buildup, but Freezing Salvo and Ice-Tipped Arrows should already be more than enough.
Levels 31–41: the Ice Shot swap
Gear
At level 33, craft your Cultist Bow or Dualstring Bow. You will most likely end up with a Cultist Bow simply because they are far more common in Act 3. Verify the base is item level 33 before you touch it with currency.
This bow lasts until 45, so invest properly. Socket an Iron Rune — but save a second one for the Artillery Bow, because that upgrade is the bigger of the two.
Skills
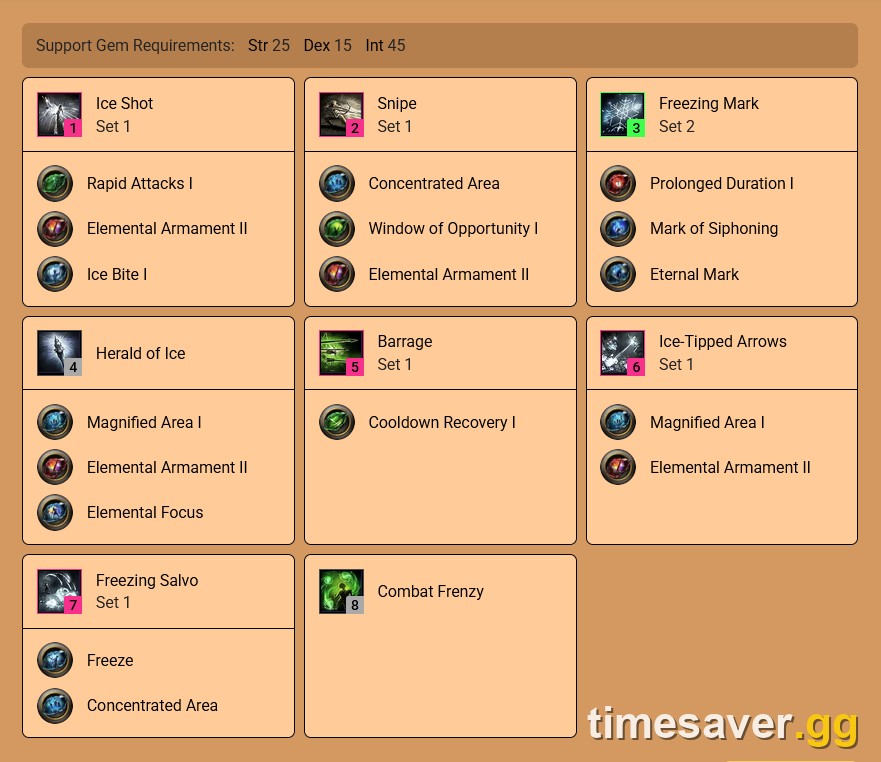
At level 31 the build finally becomes itself: Lightning Arrow out, Ice Shot in. Herald of Thunder out, Herald of Ice in.
One practical gotcha nobody mentions: in the Uncut Spirit Gem cutting menu, Herald of Ice is not offered under the Bow category — it appears under Quarterstaff and Primal. The gem itself only requires "any martial weapon" (level 10, 15 Dex, 15 Int), so it works perfectly on Ice Shot. You just have to equip a quarterstaff or talisman while you engrave it, or buy one off another player.
Lesser Jeweller's Orb priority: Snipe → Ice Shot → Freezing Mark → Herald of Ice Quality priority: Freezing Mark → Herald of Ice → Snipe
Boss rotation (levels 31+)
- Cast Ice-Tipped Arrows before the boss spawns.
- Cast Freezing Mark.
- Fire Ice Shot until the boss freezes.
- Once frozen: Barrage into Snipe.
Freezing Salvo becomes optional here. It makes freezes land faster, but Ice Shot does the job on its own, so drop it if you want a cleaner bar. For general clearing you now only need Ice-Tipped Arrows for rares and big packs.
Struggling with the Snipe window still? Swap Window of Opportunity I for Hourglass or Elemental Focus.
Levels 42–59: Artillery Bow and Tornado Shot
Gear
The Artillery Bow (base requirement level 45, 80 Dex) is your final campaign weapon, and you want it at item level 46 when you craft.
Because this base has such a high base physical damage value, percentage increased Physical Damage beats almost any other affix combination on it — it multiplies a bigger number than it would on any earlier base. If you cannot find one with %Phys, fall back to high flat rolls. None of this is a hard requirement; any high-DPS bow works. Artillery is simply the best base available to craft on at this level.
Skills
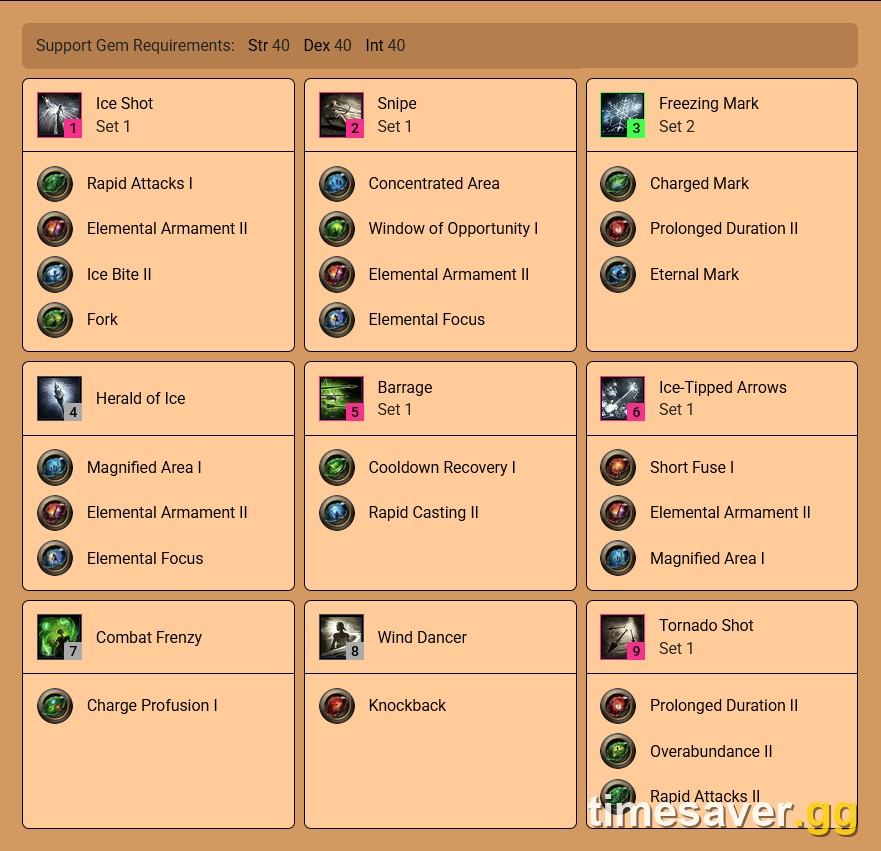
Lesser Jeweller's Orb priority: Snipe → Ice Shot → Freezing Mark → Herald of Ice Quality priority: Freezing Mark → Herald of Ice → Snipe
Two upgrades define this bracket:
- Greater Jeweller's Orbs. The first goes to Snipe for boss damage. If you find a second during the campaign, it goes to Ice Shot for Fork.
- Your first level 5 Support Gem goes to Charged Mark on Freezing Mark, which gives you reliable Shocks on bosses for a flat damage increase on top of the freeze.
Tornado Shot unlocks at level 41 and is a genuine addition here for both clear and single target. Against bosses, place it on the spawn point before the boss appears so it is already ticking when the fight starts.
The boss rotation is unchanged: Ice-Tipped Arrows → Freezing Mark → Ice Shot until frozen → Barrage into Snipe.
Level 60+: finishing the campaign
Gear
No changes. The Artillery Bow carries you through the Interludes and into maps. Keep hunting for a higher-DPS one with %Physical Damage; if a plain high-flat bow is better on the tooltip, use that instead.
Skills
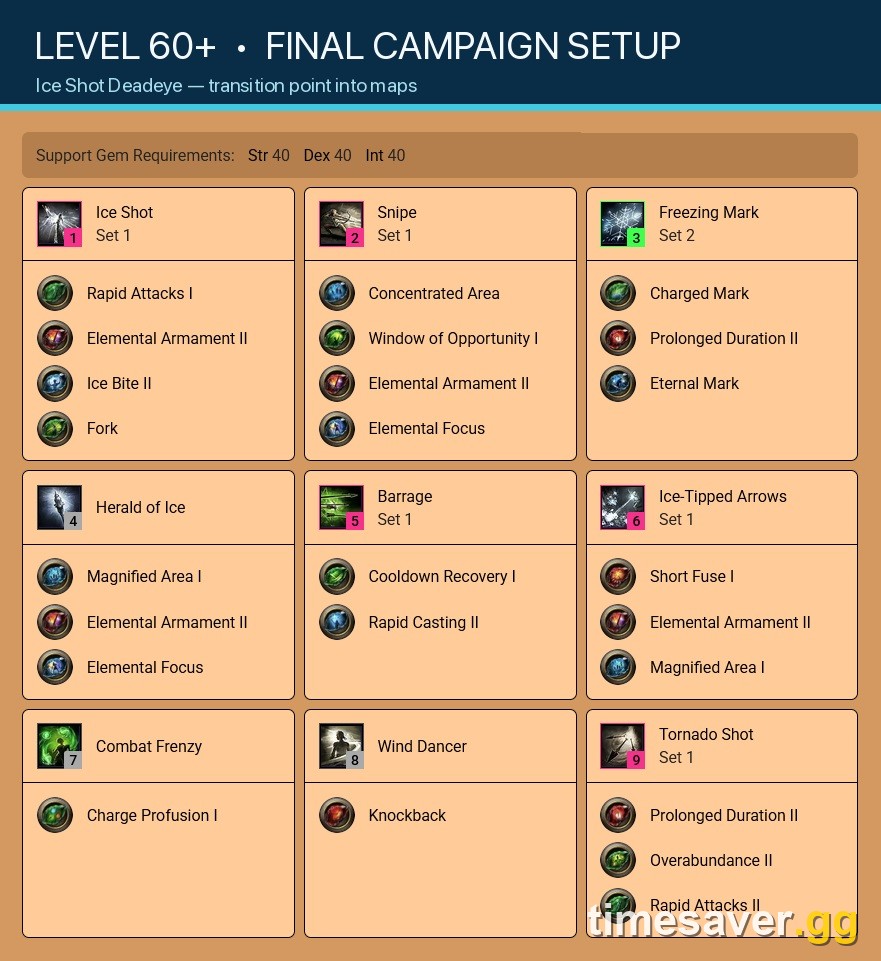
No changes either. Same Lesser Jeweller's Orb priority (Snipe → Ice Shot → Freezing Mark → Herald of Ice), same Quality priority (Freezing Mark → Herald of Ice → Snipe), same Greater Jeweller's Orb rule, same Charged Mark on Freezing Mark, same rotation:
Ice-Tipped Arrows → Freezing Mark → Ice Shot until frozen → Barrage into Snipe.
Levels 60 to 65 are the three Interludes, which sit between the campaign and endgame. This is the point to stop leveling as a campaign character and start planning your mapping build.
PoE2 - Power Leveling
Skip the grind — get Power Leveling
Passive tree and Ascendancy
Ascendancy order: Point Blank (taken through the Projectile Proximity Specialisation node) → Endless Munitions → Gathering Winds
Projectile Proximity Specialisation is the parent node with two modes — Point Blank and Far Shot. You want Point Blank. Endless Munitions grants an additional projectile, and Gathering Winds gives you Tailwind on skill use.
Levels 1–23
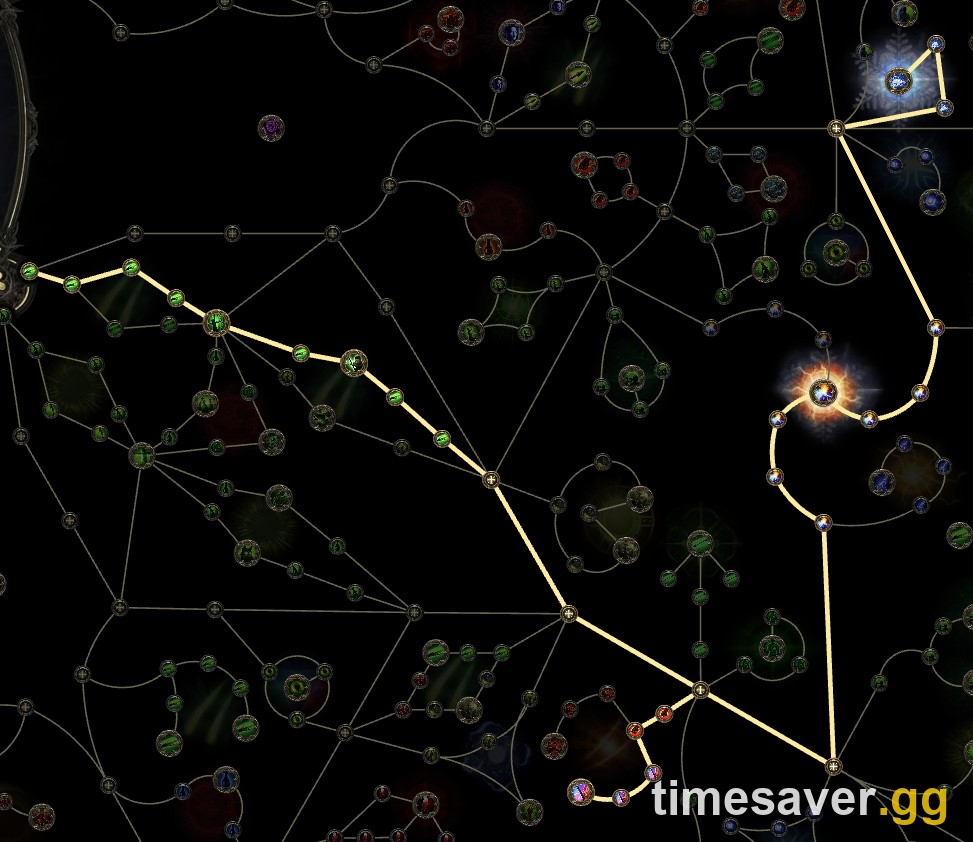
Take whatever attribute you are short on at the time. When nothing is pressing, default to Dexterity. Keep an eye out for attribute amulets and a Strength belt while you level — the level 31 gem swap is where attribute requirements actually bite, and fixing it with gear is far cheaper than spending tree points on it.
Levels 24–30
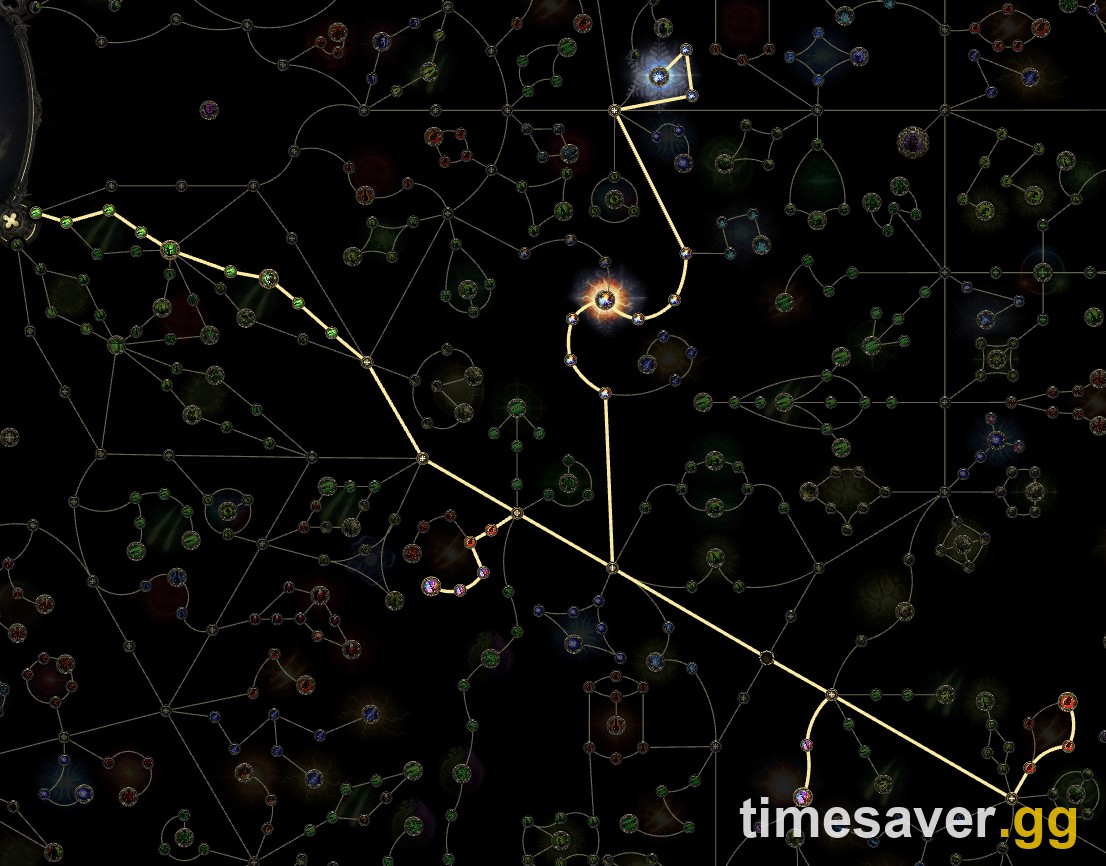
Levels 31–41

Set up your weapon swap points at level 31. You should have ten Weapon Set Passive Skill Points by the time you kill Mighty Silverfist in Act 3's Jungle Ruins.
Put Freezing Mark on Weapon Set 2 and spend those points on the Mark nodes at the bottom of the tree. Every other skill goes on Weapon Set 1. You assign a skill to a set by clicking its details in the Skill menu.
This is what makes Freezing Mark punch far above its gem level — the Mark cluster only benefits one skill, so isolating it on its own weapon set means those ten points cost you nothing anywhere else.
Levels 42–59

Level 60+

Campaign quest rewards
Most permanent rewards in the campaign are Weapon Set Passive Skill Points, which is exactly what this build wants. The rest break down as follows.
Act 1 — Clearfell (Beira of the Rotten Pack): +10% Cold Resistance. Hunting Grounds (The Crowbell): two Weapon Set points. Freythorn (The King in the Mists): +30 Spirit. Ogham Farmlands (Una's lute): two Weapon Set points. Ogham Manor (Candlemass, the Living Rite): +20 maximum Life.
Act 2 — Keth (Kabala, Constrictor Queen): two Weapon Set points. Valley of the Titans (Medallion): 30% increased Charm Charges gained and +1 Charm Slot. Deshar (Final Letter): two Weapon Set points. The Spires of Deshar (Sisters of Garukhan): +10% Lightning Resistance — note this is a shrine you find and click, not a boss fight.
Act 3 — Jungle Ruins (Mighty Silverfist): two Weapon Set points. The Venom Crypts (Venom Draught): 25% increased Stun Threshold. Jiquani's Machinarium (Blackjaw, the Remnant): +10% Fire Resistance. The Azak Bog (Ignagduk, the Bog Witch): +30 Spirit. The Molten Vault: unlocks the Reforging Bench. Aggorat (Blood Sacrifice): two Weapon Set points.
Act 4 — Journey's End (Captain Hartlin, optional): two Weapon Set points plus a level 13 Skill Gem. Eye of Hinekora (Navali's Rest): 5% increased maximum Mana. Halls of the Dead (Yama the White): two Weapon Set points. Abandoned Prison (Goddess of Justice): 30% increased Life or Mana Recovery from Flasks. Tribal Medicine: 30% increased global Armour, Evasion and Energy Shield. The three Tests — Tawhoa's, Tasalio's and Ngamahu's — each give you a Blank Tattoo that you take to a Totem of Hinekora in Halls of the Dead. Take +5 Dexterity from Tawhoa's, +5% Cold Resistance from Tasalio's and +5% Fire Resistance from Ngamahu's.
Interludes — Wolvenhold (Oswin, the Dread Warden): two Weapon Set points. The Khari Crossing (Akthi, the Final Sting and Anundr, the Sandworm): two Weapon Set points. The Khari Crossing (Molten Shrine): 5% increased maximum Life. Qimah (Tabana's Pillar): 3% increased Movement Speed. Kriar Village (Lythara, the Wayward Spear): +40 maximum Spirit. Howling Caves (The Abominable Yeti): two Weapon Set points.
The six choices worth thinking about
- Act 2, Medallion — 30% increased Charm Charges gained.
- Act 3, Venom Draught — 25% increased Stun Threshold. This choice is permanent, so pick deliberately.
- Act 4, Tattoos — Dexterity, Cold Resistance, Fire Resistance.
- Act 4, Abandoned Prison — Life Recovery from Flasks.
- Interlude — Resistance, Movement Speed, or global defences.
- Act 4, Tribal Medicine — 30% increased global Armour, Evasion and Energy Shield.
The Interlude reward can be changed at any time, so do not agonise over the first pick.
League mechanic rewards worth detouring for
The 0.5.5 league mechanic is Ritual, and Grinding Gear Games placed its campaign encounters deliberately. From the official 0.5.5 patch notes, posted by Stacey_GGG:
"Twice within each Act, and once within each Interlude, you'll find clusters of Ritual Effigies on the World Map. Within these areas, you'll find the effigies aren't in a random location in the area like they usually are, but they're on top of that area's boss fight."
Certain campaign areas hand out guaranteed rewards from the active league mechanic. These are the ones to prioritise:
Act 1 — Cemetery: Regal Orb. Tomb of the Consort: random Amulet. Hunting Grounds: Exalted Orb (optional but good). Manor Ramparts: level 5 Skill Gem (optional). Ogham Manor: Alchemy Orb — perfect timing for your level 16 bow.
Act 2 — Vastiri Outskirts: Exalted Orb. Mastadon: Lesser Jeweller's Orb — do not skip this. Valley of the Titans: random Unique (optional, occasionally excellent).
Act 4 — Ngakanu: Greater Jeweller's Orb. Do not skip this under any circumstances. It is the single most valuable campaign detour for this build.
As a general rule, the league mechanic is worth running whenever you walk past it. The areas above are the ones you should actively go out of your way for.
If you would rather run Ritual for Tribute than for leveling XP, the best 0.5.5 currency farm breakdown ranks every method in Forbidden Rites by returns per hour.
Does this guide work in Runes of Aldur?
Yes. Your existing characters were not touched by 0.5.5, and Runes of Aldur is still live. From the official 0.5.5 patch notes, posted by Stacey_GGG on the Path of Exile forums:
"All of your old characters from the Early Access launch and Runes of Aldur League are still present, and the Runes of Aldur League is still available if you wish to continue playing there."
(Source: 0.5.5 Patch Notes, Grinding Gear Games official forums)
Because 0.5.5 shipped no skill, support gem, passive tree or Ascendancy balance changes, every gem link, tree route and rotation in this guide behaves identically in both leagues. The only differences are league-specific loot: Expedition Tablets cannot be obtained in Runes of Aldur, and Sacred Blooms are Forbidden Rites only. Neither affects how you level.
Forbidden Rites runs until the 1.0 full release on December 11, and ends alongside Runes of Aldur — so a character leveled now has the full stretch to reach endgame.
Skip the grind
Leveling a Deadeye through four acts and three Interludes to reach a build that only exists after level 31 is a real time investment — roughly the length of an entire work week for most players. If you would rather start Forbidden Rites with the currency to buy your Recurve Bow, your Cultist Bow and your Artillery Bow outright instead of praying to the crafting bench:
Get ahead in 0.5.5 without the grind:
- PoE2 Currency — Exalted, Divine and Chaos Orbs delivered fast, so your level 16 and level 33 bow crafts actually land.
- PoE2 Items — skip the RNG on your Artillery Bow, quiver and attribute jewellery.
- PoE2 Boosting Services — campaign carries, leveling and Ascendancy trials handled for you.
FAQ
What level does Ice Shot unlock in PoE2? Ice Shot is a Bow Tier 9 skill gem, which requires a level 9 Uncut Skill Gem and a character level of 31 with 57 Dexterity. Level 9 Uncut Skill Gems themselves are obtainable from Act 1 onwards, so the real gate is your character level — you will typically hit 31 somewhere in Act 3. Until then you level with Lightning Arrow and Lightning Rod, which is why the first thirty levels of this build look nothing like the name on the tin.
What is the Ice Shot Deadeye boss rotation? Cast Ice-Tipped Arrows before the boss spawns, cast Freezing Mark, fire Ice Shot until the boss freezes, then Barrage into a perfect-window Snipe. Below level 31 you substitute Lightning Arrow for Ice Shot and add Freezing Salvo to speed up the freeze. If you consistently miss Snipe's timing window, swap Window of Opportunity I for Hourglass or Elemental Focus and take the flat damage instead of the skill check.
Which bows should I use while leveling a Deadeye? Four milestones: a Warden Bow at level 11 (do not invest currency in it), a heavily crafted six-mod Recurve Bow at level 16 that carries you to 33, a Cultist Bow or Dualstring Bow at level 33 crafted on an item level 33 base, and finally an Artillery Bow — base requirement level 45 — crafted at item level 46. On the Artillery Bow, prioritise percentage increased Physical Damage, because its high base physical value makes that multiplier stronger than any other affix.
What is the Deadeye Ascendancy order for this build? Take Point Blank first, via the Projectile Proximity Specialisation node — it is a choice node with two modes, Point Blank and Far Shot, and you want Point Blank. Then Endless Munitions for the additional projectile, then Gathering Winds for Tailwind on skill use. This order front-loads single-target damage for campaign bosses before adding clear speed.
Does this leveling guide still work in the Runes of Aldur league? Yes. The 0.5.5 patch notes contain no skill, support gem, passive tree or Ascendancy balance changes, and Grinding Gear Games confirmed that characters from Runes of Aldur are still present and that the league is still playable. Every gem link, support choice and passive route here performs identically in Forbidden Rites and Runes of Aldur — only league-specific loot such as Expedition Tablets and Sacred Blooms differs, and none of it affects leveling.