Danger Signs are the PR Stunt everyone remembers: a yellow warning sign, a ramp, and a car flying through the air over Japan. They are also the stunt players get stuck on most. The jump comes up 20 metres short, the sign hasn't appeared on the map yet, or a stock car just won't reach the speed. This guide lists all 20 Danger Signs in Forza Horizon 6 with their region, the Wristband that unlocks each one, the exact 3-star distance in metres and feet, and the cars that clear them.
Quick answer: There are 20 Danger Signs in Forza Horizon 6, spread across nine regions of the Japan map, worth 60 stars in total (3 each). 3-star targets range from 213.4 m / 700 ft (Rollercoaster Leap) to 640.1 m / 2,100 ft (Tokyo City Lookout). Six of them stay hidden until you earn the Purple Wristband. Most of the list falls to one of four cars: the Mercedes-AMG ONE, the 2018 Ferrari FXX-K Evo 'Welcome Pack', the 2015 Ultima Evolution Coupe 1020 and, for rough run-ups, the 2019 Toyota Tacoma TRD Pro Forza Edition. Hit the ramp dead-centre at full speed and don't brake or rewind on the run-up.
Forza Horizon 6 - Wheel Spins
Get wheel spins in 10 minutes
What is a Danger Sign in Forza Horizon 6?
A Danger Sign is one of FH6's five PR Stunt types, alongside Speed Traps, Speed Zones, Drift Zones and Trailblazers. You drive off a marked ramp and the game scores the distance you travel in the air. Three distance thresholds give one, two or three stars, and the in-game map card shows all three before you try.
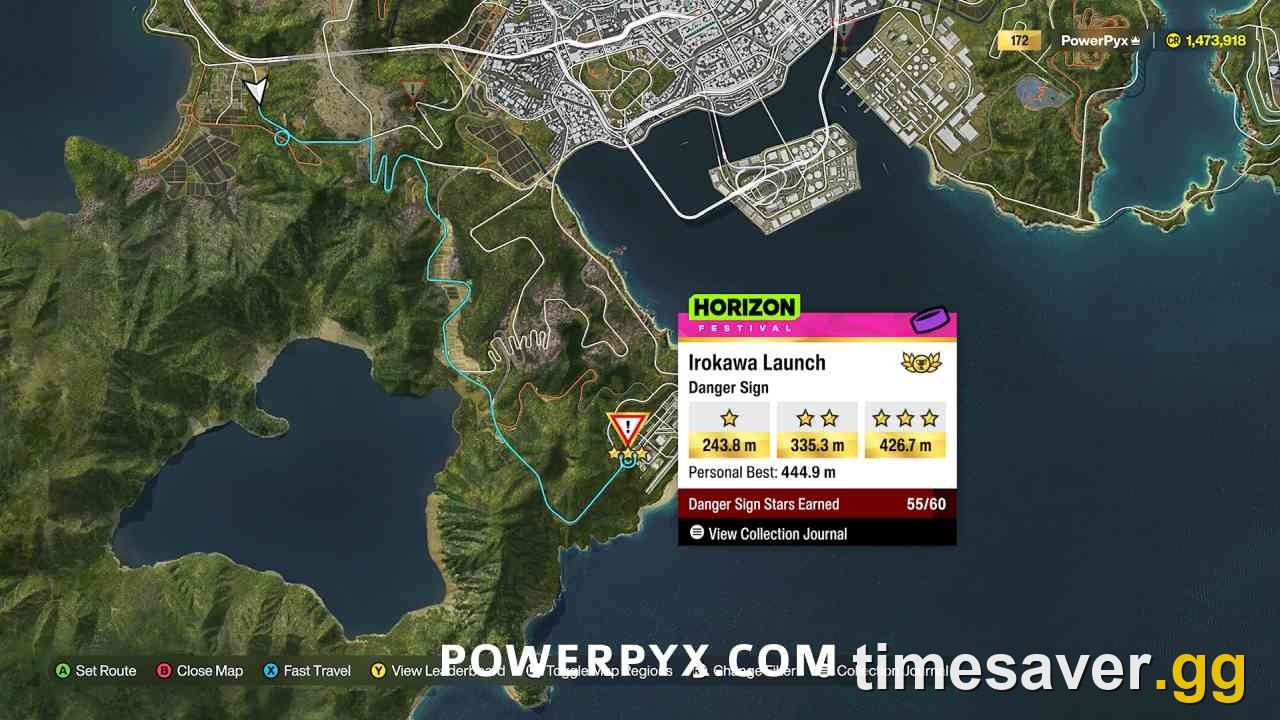
Here is the official map card for Irokawa Launch in Nangan, as shown in the in-game map (screenshot capture: PowerPyx):
| Stars | Required distance |
|---|---|
| 1 star | 243.8 m (800 ft) |
| 2 stars | 335.3 m (1,100 ft) |
| 3 stars | 426.7 m (1,400 ft) |
The same card also shows a "Danger Sign Stars Earned" counter out of 60, which confirms the total of 20 signs × 3 stars. All the targets are round numbers in feet (700, 800, 1,100 ft and so on) shown in metres. If your game is set to imperial, you'll see the feet values in the table below.
Danger Signs matter beyond bragging rights. Like every PR Stunt they pay Horizon Festival Points, which push you up the Wristband ladder toward the Gold Wristband and Legend Island (forza.net progression overview). They also feed achievements, and they come back every week as Festival Playlist PR Stunts with their own targets.
Where are all 20 Danger Signs in Forza Horizon 6?
The 20 signs sit across nine regions: Tokyo City, Nangan, Sotoyama, Takashiro, Ito, Hokubu, Shimanoyama, Ohtani and Minamino. Tokyo City Lookout sits on the Shimanoyama/Ohtani border. The table is sorted by Wristband, so you can work through it in the order the game unlocks them. Ramp speeds are approximate community recommendations from mapmaster.io, not hard limits. Locations, Wristband gates and target speeds were cross-checked against the mapmaster.io FH6 Danger Sign map and the in-game map cards.
| # | Danger Sign | Region | Wristband | 3-star distance | Approx. ramp speed | Best car |
|---|---|---|---|---|---|---|
| 1 | Festival Leap | Ohtani (south of the Festival Site) | Yellow | 274.3 m / 900 ft | 200 mph | Mercedes-AMG ONE |
| 2 | Mt. Fuji View | Ohtani (south-west) | Green | 228.6 m / 750 ft | 150 mph | Mercedes-AMG ONE |
| 3 | Rollercoaster Leap | Minamino (south-east) | Green | 213.4 m / 700 ft | 160 mph | Mercedes-AMG ONE |
| 4 | Clifftop Crest | Sotoyama (south) | Blue | 274.3 m / 900 ft | 140 mph | Mercedes-AMG ONE |
| 5 | Highway Jump | Shimanoyama (north-east) | Blue | 259.1 m / 850 ft | 135 mph | Mercedes-AMG ONE |
| 6 | Stadium Jump | Shimanoyama (central) | Blue | 365.8 m / 1,200 ft | 200 mph | Mercedes-AMG ONE |
| 7 | Alpine Heights | Sotoyama (north) | Pink | 335.3 m / 1,100 ft | 160 mph | Tacoma TRD Pro FE |
| 8 | Highlands | Takashiro (south-east) | Pink | 487.7 m / 1,600 ft | 180 mph | Mercedes-AMG ONE |
| 9 | Circuit Leap | Hokubu (north) | Pink | 304.8 m / 1,000 ft | 150 mph | FXX-K Evo Welcome Pack |
| 10 | Airfield Take-Off | Ito (west) | Pink | 243.8 m / 800 ft | 170 mph | Ultima Evolution 1020 |
| 11 | Azure Drive | Ito (north) | Orange | 365.8 m / 1,200 ft | 210 mph | Ultima Evolution 1020 |
| 12 | Seaside Heights | Ito (south) | Orange | 335.3 m / 1,100 ft | 160 mph | Ultima Evolution 1020 |
| 13 | Shirakawa-go | Ohtani (north-west) | Orange | 335.3 m / 1,100 ft | 150 mph | FXX-K Evo Welcome Pack |
| 14 | Tanbo Launch | Minamino (south-east) | Orange | 335.3 m / 1,100 ft | 200 mph | Tacoma TRD Pro FE |
| 15 | Irokawa Launch | Nangan (south) | Purple | 426.7 m / 1,400 ft | 230 mph | FXX-K Evo Welcome Pack |
| 16 | Nangan Heights | Nangan (north-east) | Purple | 396.2 m / 1,300 ft | 230 mph | FXX-K Evo Welcome Pack |
| 17 | Farmland Falls | Takashiro (south) | Purple | 548.6 m / 1,800 ft | 180 mph | Tacoma TRD Pro FE |
| 18 | Railway Bridge | Hokubu (central) | Purple | 350.5 m / 1,150 ft | 200 mph | Tacoma TRD Pro FE |
| 19 | Tokyo City Dockside | Tokyo City (east) | Purple | 518.2 m / 1,700 ft | 220 mph | Ultima Evolution 1020 |
| 20 | Tokyo City Lookout | Shimanoyama / Ohtani border | Purple | 640.1 m / 2,100 ft | 210 mph | FXX-K Evo Welcome Pack |
By the numbers: 1 sign at Yellow, 2 at Green, 3 at Blue, 4 at Pink, 4 at Orange and 6 at Purple. The Gold Wristband doesn't add any. If you only have Orange, 14 of the 20 are open to you and the six hardest are still hidden.
Why can't I find a Danger Sign on my map?
This is the most common question, and the answer is almost always Wristband progression, not a bug. Danger Signs only appear once you hold the Wristband that unlocks them. The ladder runs Yellow → Green → Blue → Pink → Orange → Purple → Gold. Those names come from the game's own achievement list, where each Wristband has its own achievement. Our Forza Horizon 6 Gold Wristband guide explains what each tier unlocks and the fastest ways to bank Festival Points.
The other common catch is the achievement for the first Purple jump. Its official description (forza.net achievement list) reads:
"Earn at least 1 Star at the Irokawa Launch Danger Sign" — To The Moon achievement, Forza Horizon 6
You can't get it before the Purple Wristband, because the ramp doesn't exist on your map until then. The same applies to the region achievement Crowd Pleaser ("Earn 36 Stars from PR Stunts in the Ohtani Region"): three Ohtani Danger Signs give 9 of those 36 stars, so three-starring them is the easy part. Our FH6 achievements guide ranks all 57.
What is the best car for Danger Signs in Forza Horizon 6?
Distance comes from speed at the lip of the ramp, plus enough stability to stay straight in the air. That points to cars with huge top speed and strong aero. You don't need 20 cars. Four cover the whole list:
| Car | Class / PI | Signs it covers | How to get it | Why it works |
|---|---|---|---|---|
| 2021 Mercedes-AMG ONE | S2 900 | 7 (all six Yellow–Blue signs plus Highlands) | Autoshow, 2,800,000 CR (or Auction House) | Fastest-accelerating S2 car; reaches ramp speed on short run-ups |
| 2018 Ferrari FXX-K Evo 'Welcome Pack' | R 998 | 5 (Irokawa, Nangan Heights, Lookout, Circuit Leap, Shirakawa-go) | Welcome Pack add-on (Deluxe/Premium editions) | Holds 210–230 mph on the long highway run-ups |
| 2015 Ultima Evolution Coupe 1020 | R 925 | 4 (all three Ito signs plus Dockside) | Autoshow, about 150,000 CR | ~1 s 0–60, 300+ mph when upgraded; the best-value jump car |
| 2019 Toyota Tacoma TRD Pro Forza Edition | R 998 | 4 (Farmland Falls, Railway Bridge, Tanbo Launch, Alpine Heights) | Autoshow, VIP owners only | Long-travel suspension keeps speed on bumpy dirt run-ups |
Two practical notes:
- The Tacoma FE needs VIP. It's one of three VIP Forza Edition cars. The official car list shows it in the Autoshow only for VIP owners (forza.net car list). If you don't have VIP, a fully upgraded AMG ONE or Ultima clears Farmland Falls and Railway Bridge too, but it's less forgiving on the dirt. Our VIP membership guide covers what else VIP includes.
- The Ultima is the budget answer. The AMG ONE costs 2,800,000 CR in the Autoshow (game8). The Ultima costs around 150,000 CR, which makes it the cheapest car in the game that reliably passes 300 mph. If you only buy one car for PR Stunts, buy this one. It's also the backbone of our Speed Traps guide.
Upgrades matter more than the badge. A stock car often falls short on the Purple signs even with a perfect line. Buy the full power, weight and aero upgrades (or apply a speed-focused tune) before you try Farmland Falls, Dockside or Lookout. For a wider top-speed ranking, see Forza Horizon 6 fastest cars and our best S2 cars list.

How do you get 3 stars on every Danger Sign?
Getting 3 stars comes down to the run-up, not the jump. Follow this checklist on every attempt:
- Find the long run-up first. Every sign has a "right" direction. Mapmaster's notes, for example, say to start Highway Jump from Fuji Unkai House and to come into Tokyo City Lookout from the north-western hill past the tarmac road. Set a waypoint on the start point and drive the line once slowly.
- Hit the ramp dead-centre and straight. An angled take-off sends the car sideways, which costs distance and often flips it. The note for Nangan Heights is to stay in the middle of the road all the way and in the middle of the ramp.
- Reach the target speed at the lip, not before. The speeds in the table are what you need at the ramp. Over a crest the car goes light and loses speed, so brake lightly before bumps on the run-up rather than on the ramp itself.
- Use rewind on the approach, not the jump. Rewinding a few seconds when you clip something on the run-up saves a full reset. If an attempt doesn't register after a rewind through the ramp, drive back to the start point and do one clean run.
- Watch the season. Winter covers the map in snow and some roads freeze. On the long dirt run-ups (Farmland Falls, Tanbo Launch, Alpine Heights), a summer or autumn week usually makes the 3-star target easier.
- Clear traffic on Tokyo runs. Dockside and Lookout run through the city, and one AI car on the approach ends the run. Take a second to check the road ahead before you go.
Recommended order: start with the Green signs (Rollercoaster Leap at 213.4 m and Mt. Fuji View at 228.6 m are the two easiest in the game). Then do the three Blue signs, then Pink and Orange once your AMG ONE or Ultima is fully upgraded. Leave the Purple signs for last, especially Tokyo City Lookout (640.1 m) and Farmland Falls (548.6 m), the two longest jumps in the game.
Forza Horizon 6 - Credits
Get up to 999M Credits in 10 minutes
Are Festival Playlist Danger Signs different from the map ones?
Yes. This trips people up every week. Seasonal PR Stunts in the Festival Playlist reuse the same ramps but set their own target and car restriction. In Series 3, the Winter week's Festival Leap asked for 305 m in a Modern Sports Car (A class), not the open-class 274.3 m 3-star mark. A Series 4 week asked for just 180 m at Tanbo Launch in a B-class Retro Sports Car. Each seasonal Danger Sign paid a Wheelspin and 2 Playlist points.
Two consequences:
- Your open-world 3 stars don't complete the seasonal stunt. You have to re-run it in a car that meets the restriction.
- Locked-tune tricks no longer work. The July 13 Series 3 update (forza.net release notes) fixed a PR Stunt exploit where a locked tune carried speed into a lower car class. Build a car that is actually legal for the class.
Weekly challenges also use the signs. One recent example, the "Extreme Rover" weekly, included 4 stars at Danger Signs in a Land Rover Defender 110 X, as one step toward its 25,000 CR reward. Two easy Green signs in the Defender clear that step in minutes.
Do Danger Signs help you farm credits or XP?
Not really, and it's worth being honest about that. A Danger Sign is a one-time star and Festival Point payout. Once you've three-starred it, repeat jumps don't pay the star rewards again. Danger Signs are good for Wristband progress and completion. They are not a money farm.
If credits are the goal, the efficient methods are elsewhere: Auction House flipping since the 20M CR cap fix, long-race laps on Legend Island, and Car Mastery perks. Our how to make credits fast in Forza Horizon 6 guide ranks them by CR per hour. Credits are what buy an AMG ONE and an Ultima with full upgrades. That's the real cost of a 60/60 Danger Sign run.
Short on credits for a 2.8M CR AMG ONE and the upgrades every Purple jump needs? Skip the grind and go straight to clearing all 20 signs:
- Forza Horizon 6 Credits — instant delivery · safe · best rate
- Forza Horizon 6 All-Cars Bundle — every car in the game, instantly
- Forza Horizon 6 Wheelspins — skip the grind for rare cars
- Forza Horizon 6 Account Leveling — Wristband progress, hands-free
FAQ
How many Danger Signs are in Forza Horizon 6? There are 20 Danger Signs across nine regions of Japan, worth 60 stars in total. The in-game map card shows a "Danger Sign Stars Earned" counter out of 60.
What is the longest Danger Sign jump in FH6? Tokyo City Lookout, on the Shimanoyama/Ohtani border. It needs 640.1 m (2,100 ft) for 3 stars and only appears once you have the Purple Wristband. Farmland Falls in Takashiro is second at 548.6 m (1,800 ft).
Why isn't a Danger Sign showing on my map? Signs unlock with Wristband progression. Six are hidden until you reach Purple, including Irokawa Launch, the one tied to the To The Moon achievement. Earn more Festival Points and the next tier's signs appear.
What is the best car for Danger Signs in Forza Horizon 6? The Mercedes-AMG ONE (2,800,000 CR in the Autoshow) covers the most signs (7), the Ferrari FXX-K Evo 'Welcome Pack' handles the 210–230 mph Purple jumps, and the 2015 Ultima Evolution Coupe 1020 is the budget pick at about 150,000 CR. The Toyota Tacoma TRD Pro Forza Edition (Autoshow, VIP owners only) is best on the bumpy dirt run-ups.
Does three-starring a Danger Sign complete the Festival Playlist PR Stunt? No. Playlist Danger Signs reuse the same ramps but have their own distance target and car restriction, so re-run them in a car that fits the week's rule.
What is the easiest Danger Sign in FH6? Rollercoaster Leap in Minamino. It needs 213.4 m (700 ft) for 3 stars and unlocks at the Green Wristband. Mt. Fuji View in Ohtani (228.6 m) is a close second.