Search "lunar reactions" and most pages will tell you there are two. There are three. And the reaction people are actually asking about right now, Stellar Swirl, is not a Lunar Reaction at all.
Two reaction families, two unlock gates, two character pools, one shared damage formula. Here is the clean version, with the arithmetic that decides how you build.
Quick answer: There are three Lunar Reactions — Lunar-Charged (Electro plus Hydro), Lunar-Bloom (Dendro plus Hydro) and Lunar-Crystallize (Geo plus Hydro). All three are Hydro-based and need a party member with an enabling Moonsign Benediction passive. Separately there are two Stellar Glimmer Reactions — Stellar-Conduct (Electro plus Cryo) and Stellar Swirl (Anemo plus Cryo) — which are Cryo-based and gated by a Stellar Jubilee passive on a different character pool. What both families share: unlike Swirl, Overloaded or Hyperbloom, their damage can CRIT, using the CRIT Rate and CRIT DMG of the contributing characters — or of the character whose talent deals it directly.
Article status: written 19 September 2026, accurate for Version 7.0. Behaviour and Moonsign wording come from the in-game tutorials, the Team Bonus screen and HoYoverse's Version 7.0 Update Details. The damage formulas are community-derived from frame-by-frame testing documented on the Genshin Impact Wiki, not published by HoYoverse. No leaks or datamines anywhere here.
What are Lunar Reactions in Genshin Impact?
A Lunar Reaction is an upgraded version of an existing Hydro reaction. You press nothing different — you trigger the same Electro-on-Hydro, Dendro-on-Hydro or Geo-on-Hydro interaction you always did, and if the party is eligible the game resolves the lunar version instead.
Eligibility is the whole thing. The wiki states it plainly: "a character with a Moonsign Benediction passive talent that converts specific Hydro-related elemental reactions must be present in the party." No enabler means a plain Electro-Charged, Bloom or Crystallize.
One detail people get wrong: holding a Moonsign Benediction passive does not automatically make a character a Lunar Reaction enabler. Those passives belong to Nod-Krai characters and to Zibai and each raises the party's Moonsign level by 1, while the ones belonging to Columbina and to Moon Wheel users "additionally enable and enhance Lunar Reactions." Moonsign level and Lunar Reaction access are two different things — you can sit at Ascendant Gleam and trigger no Lunar Reactions at all.
They also break the usual rule about reaction damage. Swirl, Overloaded, Electro-Charged, Bloom and Hyperbloom are transformative and cannot CRIT by default. Lunar and Stellar Glimmer damage can. The in-game Lunar-Charged tutorial puts it in one line: "This DMG can trigger CRIT Hits, and the DMG dealt is based on all characters who have applied elements during the reaction." The second half of that sentence is the part nobody builds around.
What are the three Lunar Reactions?
Lunar-Charged (Electro plus Hydro)
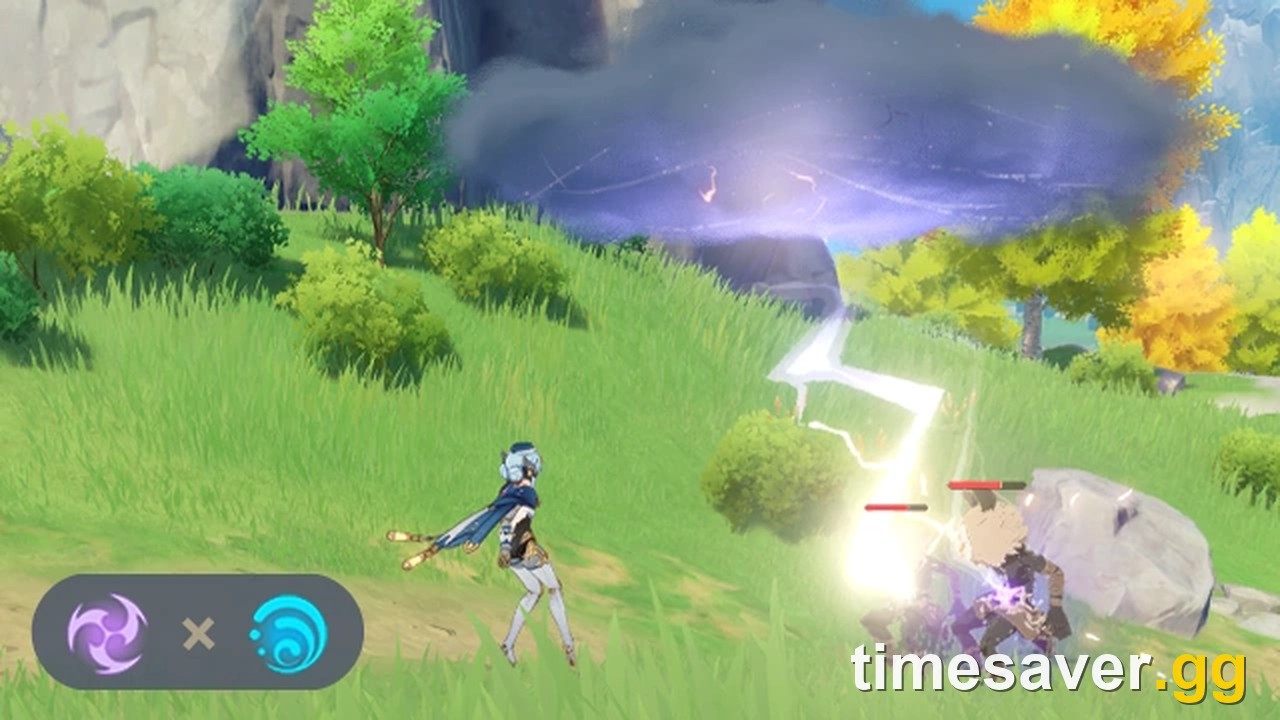
The flagship. Instead of Electro-Charged's chained ticks, Lunar-Charged spawns a thundercloud that parks over the fight and fires down at wet, Electro-affected targets. Per the wiki's reaction page:
- It hits every opponent in its radius affected by both Wet and Electro simultaneously, every 2 seconds. The wiki's 5-metre figure still carries an unverified tag, so treat the exact radius as a community measurement.
- Each pulse consumes 0.4 gauge units of both the Wet and Electro auras.
- The cloud lasts 6 seconds, and re-triggering resets that duration rather than stacking a second one. Only one exists at a time.
So it turns a single-target damage-over-time into area denial, and rewards keeping the cloud alive over re-applying.
Lunar-Bloom (Dendro plus Hydro)
The confusing one, because on its own it does nothing. The wiki is blunt: "Lunar-Bloom does no DMG on its own. Currently, the only way to deal Lunar-Bloom DMG is through character Talents and Constellations."
What it gives you is Verdant Dew. Triggering Lunar-Bloom opens a 2.5-second window granting 1 Verdant Dew every 2.5 seconds, and triggering again while that window runs resets it — which is how you climb to the cap of 3. Verdant Dew is then unusually sticky: it lasts indefinitely and survives party changes, teleports, daily resets and closing the game.
One misread worth killing: the Dendro Cores and Bountiful Cores Lunar-Bloom creates are identical to normal Bloom cores, and their damage is not Lunar-Bloom damage.
Lunar-Crystallize (Geo plus Hydro)

The newest and least documented. The in-game tutorial:
When Geo meets Hydro, and certain other conditions are met, a special Lunar-Crystallize reaction occurs, and three Moondrifts will form near the target. Triggering the Lunar-Crystallize reaction three times will initiate Moondrift Harmony, which deals Geo DMG to nearby opponents. This DMG can trigger CRIT Hits, and the DMG dealt is based on all characters who have applied elements during the reaction.
Source: Genshin Impact in-game tutorial, "Elemental Reaction: Lunar-Crystallize".
So it is a three-stack payoff, not an every-trigger payoff. Each reaction drops three Moondrifts around the target; every third makes them resonate and fire a tracking Geo projectile.
There is a free bonus hiding in that. The Enduring Rock resonance normally gates its best half behind a shield, but its text names Moondrifts as an explicit alternative: "when characters protected by a shield or when Moondrifts formed by Lunar-Crystallize reactions are nearby," the party gains 15 percent DMG and strips 20 percent Geo RES for 15 seconds on hit. A double-Geo Lunar-Crystallize team gets the shielded-tier resonance with no shielder.
Stellar Glimmer Reactions are not Lunar Reactions
The biggest source of confusion in this cluster, so flatly: Stellar Swirl is not a Lunar Reaction and Moonsign does not switch it on.
The Stellar Glimmer family is Cryo-based and Snezhnayan. Its gate is a Stellar Jubilee passive, belonging to Snezhnaya characters carrying Stellar Linchpins plus the Cryo Traveler. A Stellar Linchpin is a Vision-like object, which is why those characters' cards read "Stellar Linchpin: Cryo" rather than "Vision: Cryo".
There are two members:
- Stellar-Conduct (Electro plus Cryo). Like Lunar-Bloom, the reaction deals no damage itself — it is a field generator. It creates a Starlight Prism lasting 7 seconds that sustains a Polestar Field. Inside it, element-applying Cryo and Electro hits are counted; every 4 seconds the count resets and grants 4-second buffs scaled to it, plus a flat 40 percent Physical RES reduction in the field. The scaling is front-loaded rather than smooth: the Stellar-Conduct base reaction coefficient sits at 1 with no recorded hits, jumps to 1.45 on the very first hit, then climbs 0.05 per hit to 2 at twelve hits. Cryo and Electro DMG Bonus does the same — 20 percent at zero hits, 29 percent at one, then plus 1 percent per hit to 40. That first hit is most of the buff. The coefficient it raises is the one your next Stellar-Conduct reactions use.
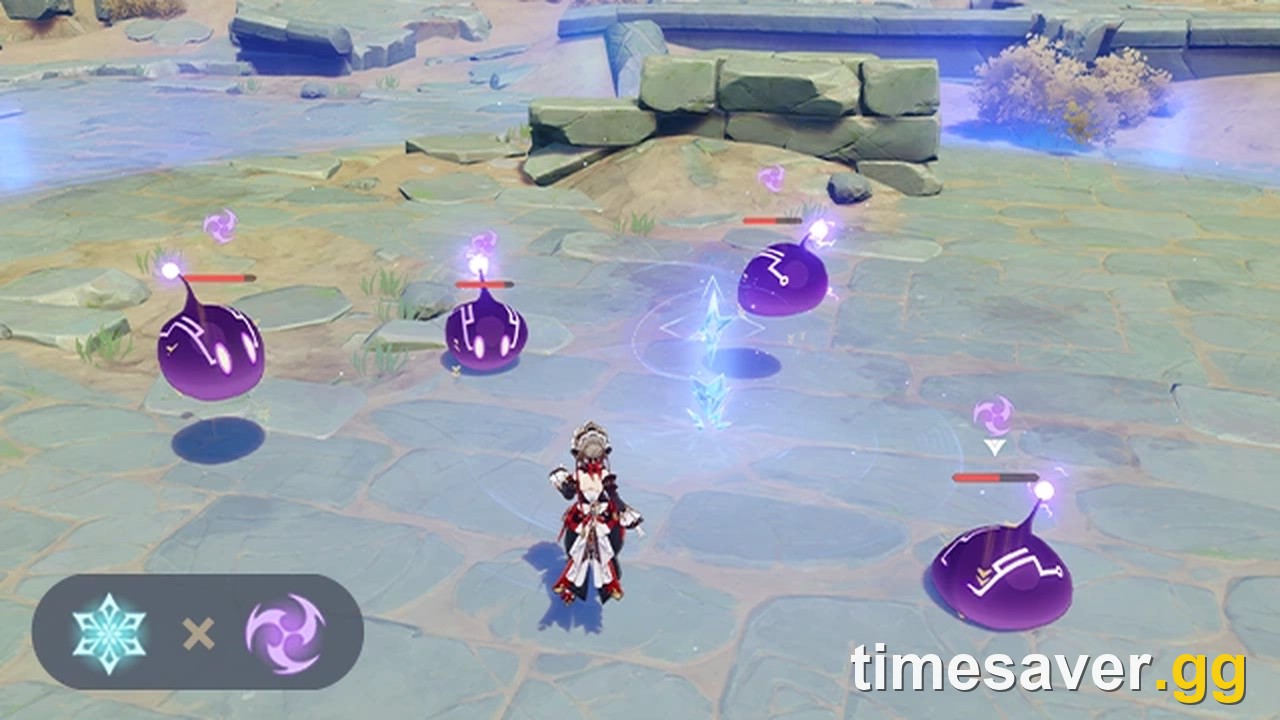
- Stellar Swirl (Anemo plus Cryo). HoYoverse's Version 7.0 Update Details describes it as follows:
Under certain conditions, Anemo and Cryo can trigger Stellar Swirl, dealing one instance of Anemo DMG to the target and creating a Stellar Vortex. Only one Stellar Vortex can exist within the same area at a time. A Stellar Vortex detonates after a short delay, dealing AoE Cryo DMG. Triggering Stellar Swirl nearby a certain number of times increases the vortex's level, expanding its blast radius and increasing its DMG.
Source: HoYoverse, "Everwinter Without Mercy" Version 7.0 Update Details, in-game announcement.
HoYoverse's notice says only "a certain number of times." The exact counts come from the Genshin Impact Wiki, not the announcement: the Lv. 1 vortex lasts 3 seconds, the third trigger promotes it to Lv. 2 for a bigger blast, and three more detonate it immediately. For 5 seconds after a vortex explodes your next jump goes higher — a useful exploration side effect.
Why does a fourth element applier add almost nothing?
This falls out of that tutorial clause: "the DMG dealt is based on all characters who have applied elements during the reaction."
One scope limit most guides skip: indirect Lunar and Stellar Glimmer damage "can only be dealt by Lunar-Charged, Lunar-Crystallize, and Stellar Swirl, not Lunar-Bloom and Stellar-Conduct." Everything below applies to those three.
Per the wiki's damage page — frame-by-frame testing, not a HoYoverse publication — the game calculates a separate damage figure for every character who contributed an element, using that character's own level, Elemental Mastery and CRIT stats, then sorts them highest to lowest and blends:
| Contributor rank | Share of its own damage that counts |
|---|---|
| Highest | 60 percent |
| 2nd highest | 30 percent |
| 3rd highest | 5 percent |
| 4th highest | 5 percent |
If fewer than four characters contributed, the missing entries are dropped — the remaining multipliers do not scale up to compensate.
That table quietly kills a popular team-building instinct. Going from two contributors to four raises total blend weight from 0.90 to 1.00, a ceiling of roughly 11 percent more damage, and only if your third and fourth appliers hit as hard as your first, which they never do. In a real party, slots three and four are worth low single digits.
One more consequence: whether the final hit counts as a CRIT, for things like Favonius passives, is decided by the highest individual contribution — not the blend.
Is Elemental Mastery still the default stat here?
Both families use their own, much shallower Elemental Mastery curve. Transformative reactions use 16 times EM divided by EM plus 2000; Lunar and Stellar Glimmer reactions use 6 times EM divided by EM plus 2000 — the same shape with three-eighths of the coefficient.
| Elemental Mastery | Lunar / Stellar bonus | Transformative bonus |
|---|---|---|
| 200 | 55 percent | 145 percent |
| 400 | 100 percent | 267 percent |
| 600 | 138 percent | 369 percent |
| 800 | 171 percent | 457 percent |
| 1,000 | 200 percent | 533 percent |
The trade is explicit: you lose most of the Elemental Mastery scaling and get CRIT back in exchange. The stat priority that wins on a Hyperbloom team is the wrong one here.
Price the crossover in artifact substat rolls, not round numbers — 100 Elemental Mastery and 10 percent CRIT Rate are not the same amount of farming. A five-star minor affix averages about 19.8 Elemental Mastery or 3.3 percent CRIT Rate.
Per roll, on a 60 percent CRIT Rate and 120 percent CRIT DMG contributor, a CRIT Rate roll is worth a flat 2.3 percent more damage at any Elemental Mastery level. An Elemental Mastery roll is worth 3.2 percent at 200 EM, 2.5 percent at 300, 2.3 percent at around 340 and only 2.1 percent at 400. The switchover lands near 340 Elemental Mastery, not in the high hundreds — and lower still once a flat Lunar Reaction DMG bonus like Ascendant Gleam joins the same additive bracket. Rough model, not a solver output, but the direction is not close.
What do Nascent Gleam and Ascendant Gleam actually give you?
Moonsign is a party-wide bonus. Its in-game description reads:
When Moonsign characters are in the party, the party will attain a Moonsign Level corresponding to the number of such characters. When the party reaches "Moonsign: Ascendant Gleam," Moonsign characters will be enhanced. Non-Moonsign characters can also provide buffs to the party.
Source: Genshin Impact in-game Team Bonus description.
Nascent Gleam is one Moonsign character; everyone gains its effect. Ascendant Gleam is two: it enhances certain Moonsign talents and skills, keeps the Nascent Gleam effects and adds the buff below.
At Ascendant Gleam, for 20 seconds after a non-Moonsign character casts a Skill or Burst, that character increases Lunar Reaction DMG for all nearby characters, scaling off their own element and stat. It does not stack, and caps at 36 percent.
| Flex slot element | Scaling | Stat needed to cap at 36 percent |
|---|---|---|
| Pyro, Electro, Cryo | 0.9 percent per 100 ATK | 4,000 ATK |
| Hydro | 0.6 percent per 1,000 Max HP | 60,000 Max HP |
| Geo | 1 percent per 100 DEF | 3,600 DEF |
| Anemo, Dendro | 2.25 percent per 100 Elemental Mastery | 1,600 Elemental Mastery |
Nobody caps this. In practice a Geo unit at around 2,800 DEF contributes roughly 28 percent; an Anemo or Dendro unit at 1,000 Elemental Mastery, 22.5 percent; a Hydro unit at 34,000 Max HP or an ATK-scaling unit at 2,200 ATK, about 20 percent each.
Put that next to the contributor table. A fourth element applier is worth low single digits; a fourth slot holding a non-Moonsign buffer with a good stat is worth 20 to 28 percent. Stop adding appliers, add a buffer.
One constraint the table does not show: the buffer has to cast a Skill or Burst, so it is also applying its element — and every Lunar Reaction runs on a Hydro aura. Pyro Vaporizes that aura away, Cryo Freezes it, Anemo Swirls it off. Prefer units whose element is already part of the reaction, or off-field units that buff without repeatedly hitting the target — a high-DEF Geo unit in a Lunar-Crystallize team being the cleanest version.
Where do Lunar Reactions matter right now in Version 7.0?
Two live places, both first-party:
- Spiral Abyss, Version 7.0 Phase 2 (live from 16 September 2026). Floor 12's second half carries Lunar-Charged DMG plus 75 percent; the first half carries Swirl plus 200 percent and Stellar Swirl plus 75 percent. This cycle's Blessing of the Abyssal Moon, Cascading Moon, turns Swirl or Stellar Swirl damage into a True DMG shockwave once every 4 seconds. The Blessing is cycle-wide, not per-floor, and changes on the 16th of each month — so this one runs to 16 October 2026.
- The Version 7.0 artifact sets. Scarlet Proof: 18 percent ATK at two pieces; at four, 16 percent CRIT Rate plus 40 percent Stellar Swirl reaction damage for 10 seconds after triggering Stellar Swirl. Heart of the Furnace: 18 percent ATK at two; at four, 12 percent ATK for 12 seconds on triggering or dealing Stellar Glimmer damage, plus 50 percent Stellar Glimmer reaction damage for nearby party members.
Note which family those sets serve: both are Stellar Glimmer sets, not Lunar sets.
For the characters who carry these teams: Vodyanitsa build for 7.1, Vesna build for 7.1, Aino build for Version 7.0 and Ineffa build for Version 7.0. If you are deciding who to pull for, the Version 7.1 banner line-up covers what is confirmed and what is not.
More Genshin Impact guides
Frequently Asked Questions
How many Lunar Reactions are there in Genshin Impact? Three: Lunar-Charged, Lunar-Bloom and Lunar-Crystallize. Many guides list only the first two because Lunar-Crystallize came later. Stellar-Conduct and Stellar Swirl are often counted alongside them but belong to the separate Stellar Glimmer family.
How do you trigger Lunar Reactions? Trigger the ordinary Hydro reaction — Electro, Dendro or Geo onto Hydro — while a party member holds a Moonsign Benediction passive that enables Lunar Reactions. The game upgrades it automatically. Without an enabler you get the base version.
Do you need Moonsign to trigger Stellar Swirl? No. Stellar Swirl is a Stellar Glimmer Reaction gated by a Stellar Jubilee passive, which belongs to Snezhnaya characters with Stellar Linchpins and to the Cryo Traveler.
Can Lunar Reactions CRIT? Yes, and that is the main mechanical difference from transformative reactions like Swirl or Hyperbloom. Lunar and Stellar Glimmer damage uses the CRIT Rate and CRIT DMG of each contributing character.
Should I build Elemental Mastery or CRIT for Lunar Reactions? Both, with an early switchover. The Lunar and Stellar Glimmer curve is 6 times EM divided by EM plus 2000, far shallower than the transformative curve. Priced per artifact substat roll, one CRIT Rate roll overtakes one Elemental Mastery roll at around 340 Elemental Mastery on a 60 percent CRIT Rate and 120 percent CRIT DMG contributor — earlier still with a flat Lunar Reaction DMG bonus in play.
How many element appliers should a Lunar Reaction team run? Two. Indirect Lunar and Stellar Glimmer damage — which only Lunar-Charged, Lunar-Crystallize and Stellar Swirl produce — blends contributors at 60, 30, 5 and 5 percent by rank, so the third and fourth appliers add very little. A non-Moonsign buffer in that slot is worth far more, since Ascendant Gleam pays up to 36 percent off that character's own stat.
Does Lunar-Bloom deal damage? Not by itself. The only way to deal Lunar-Bloom damage is through character talents and constellations. The Dendro and Bountiful Cores it produces are ordinary Bloom cores.
Accurate for Genshin Impact Version 7.0 as of 19 September 2026. Damage formula values are community-derived from frame-by-frame testing documented on the Genshin Impact Wiki, not published by HoYoverse. Version 7.1 arrives on 23 September 2026 and may adjust these systems.