Two days after "A Rekviem for the Underworld" went live, a thread on r/GenshinImpactTips asked it in plain terms: Stellar-Conduct versus Stellar Swirl, which is better, and what are the use cases exactly?
The question contains a false premise, and spotting that is worth more than any tier list. You do not pick between Stellar-Conduct and Stellar Swirl. The exact same passive talents enable both, and which one you get is decided entirely by which two elements collide.
This guide is current as of 24 September 2026, one day into Version 7.1, which went live on 23 September 2026.
Quick answer: Stellar-Conduct is what Superconduct becomes (Cryo plus Electro). Stellar Swirl is what Cryo Swirl becomes (Anemo plus Cryo). The same three Stellar Jubilee Passives convert both. Stellar-Conduct deals zero damage by itself — it creates a Starlight Prism that buffs your team and strips 40% Physical RES. Stellar Swirl is a damage reaction, with base coefficients of 0.75 on the initial hit, 2 at Vortex Lv. 1 and 3 at Vortex Lv. 2. If you want damage from the reaction itself, that is Stellar Swirl. If you want a field that makes everything else hit harder, that is Stellar-Conduct.
What actually decides which Stellar Glimmer reaction you trigger?
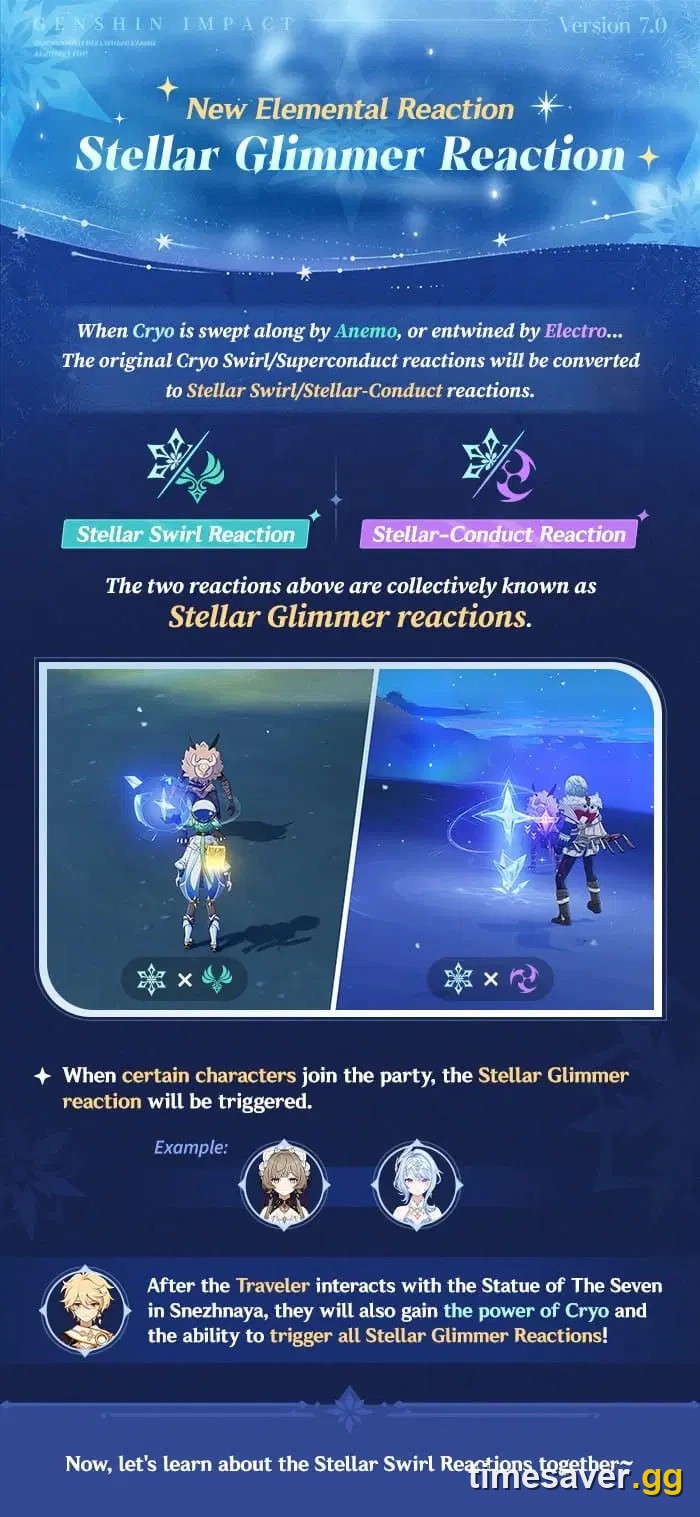
Stellar Glimmer reactions are not base-game reactions. The wiki's own summary of the mechanic is unambiguous on the prerequisite: "a character with a passive talent that converts specific Cryo-related elemental reactions must be present in the party."
That converting passive is called a Stellar Jubilee Passive, and three playable characters currently have one. Read the actual text of Odette's, "Dance of Aurore," and the whole argument resolves itself:
"When a party member triggers a Superconduct or Cryo Swirl reaction, it becomes a Stellar-Conduct or Stellar Swirl reaction instead, and the Base DMG of said reaction is also increased by 0.7% for every 100 points of Odette's ATK. A maximum increase of 14% can be obtained this way."
One passive. Two reactions. The conversion rule is mechanical:
- Cryo + Electro triggers Superconduct, which becomes Stellar-Conduct
- Anemo + Cryo triggers Cryo Swirl, which becomes Stellar Swirl
So the real decision is not "which reaction is better." It is "which second element am I bringing alongside Cryo." Bring an Electro character and you are a Stellar-Conduct team whether you intended it or not. Bring an Anemo character and you are a Stellar Swirl team. Bring both and you flip between the two, which is a legitimate 7.1 build path.
The two were also introduced a full version apart, which is why they feel so different. Per the official HoYoLAB announcement: "Following the Stellar-Conduct Reaction introduced in Version Luna VIII, Version 7.0 will bring us a brand-new Stellar Glimmer Reaction: Stellar Swirl." Stellar-Conduct is the older, field-based half of the family. Stellar Swirl is the newer, damage-based half.
Our breakdown of the Lunar reaction family covers Lunar-Charged, Lunar-Bloom and Lunar-Crystallize — they share a damage formula with Stellar Glimmer, which matters later in this guide.
What does Stellar-Conduct actually do in Version 7.1?
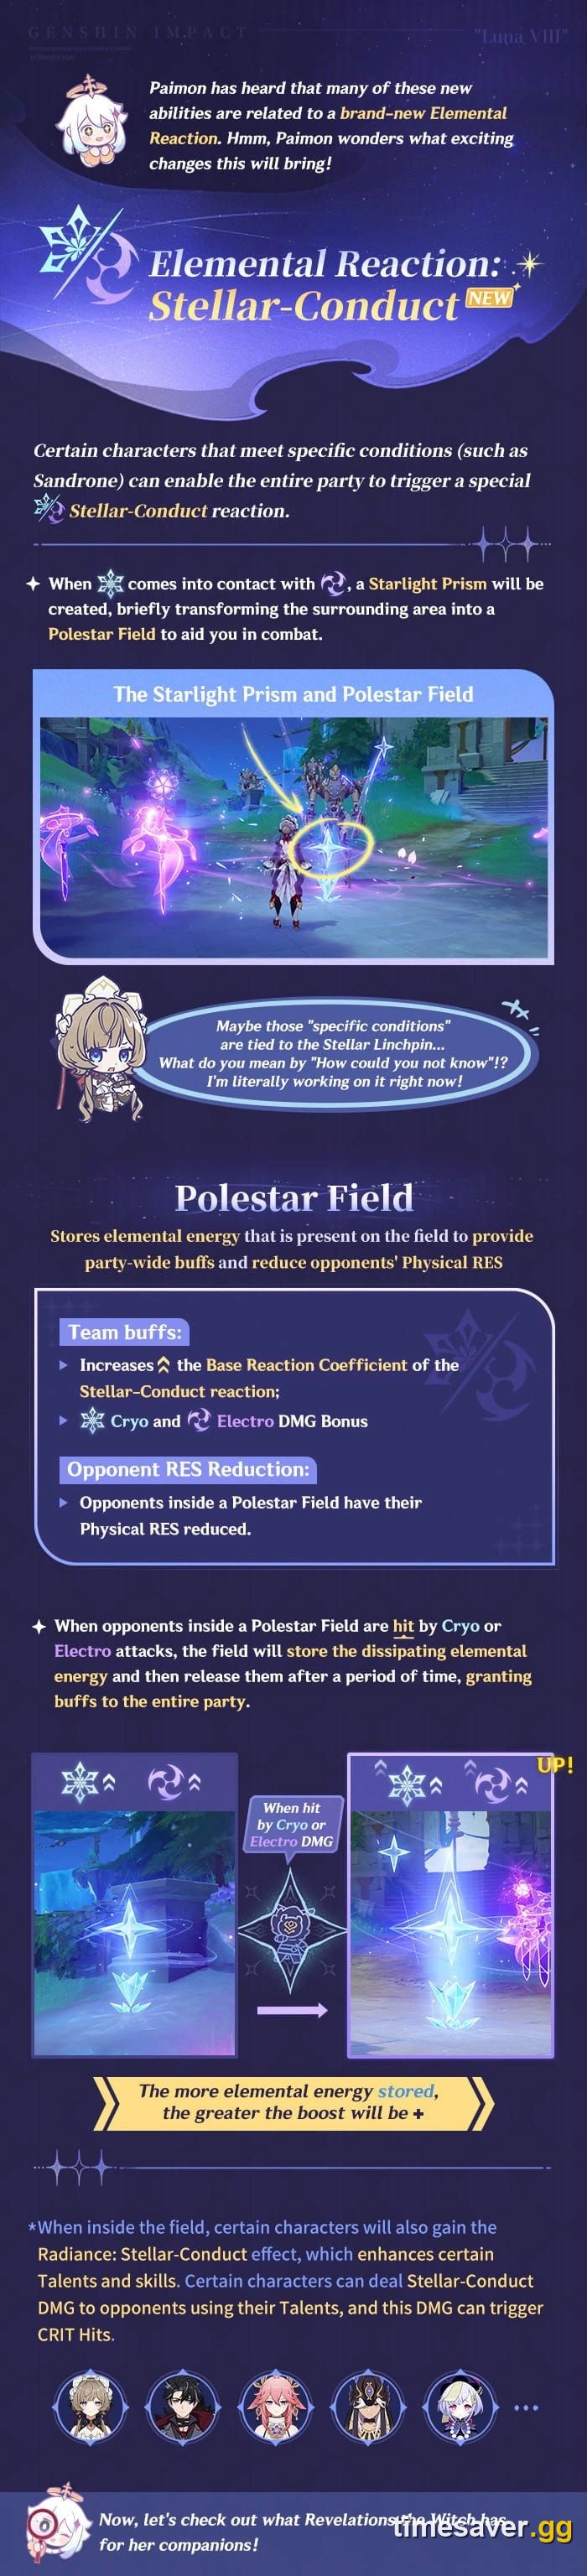
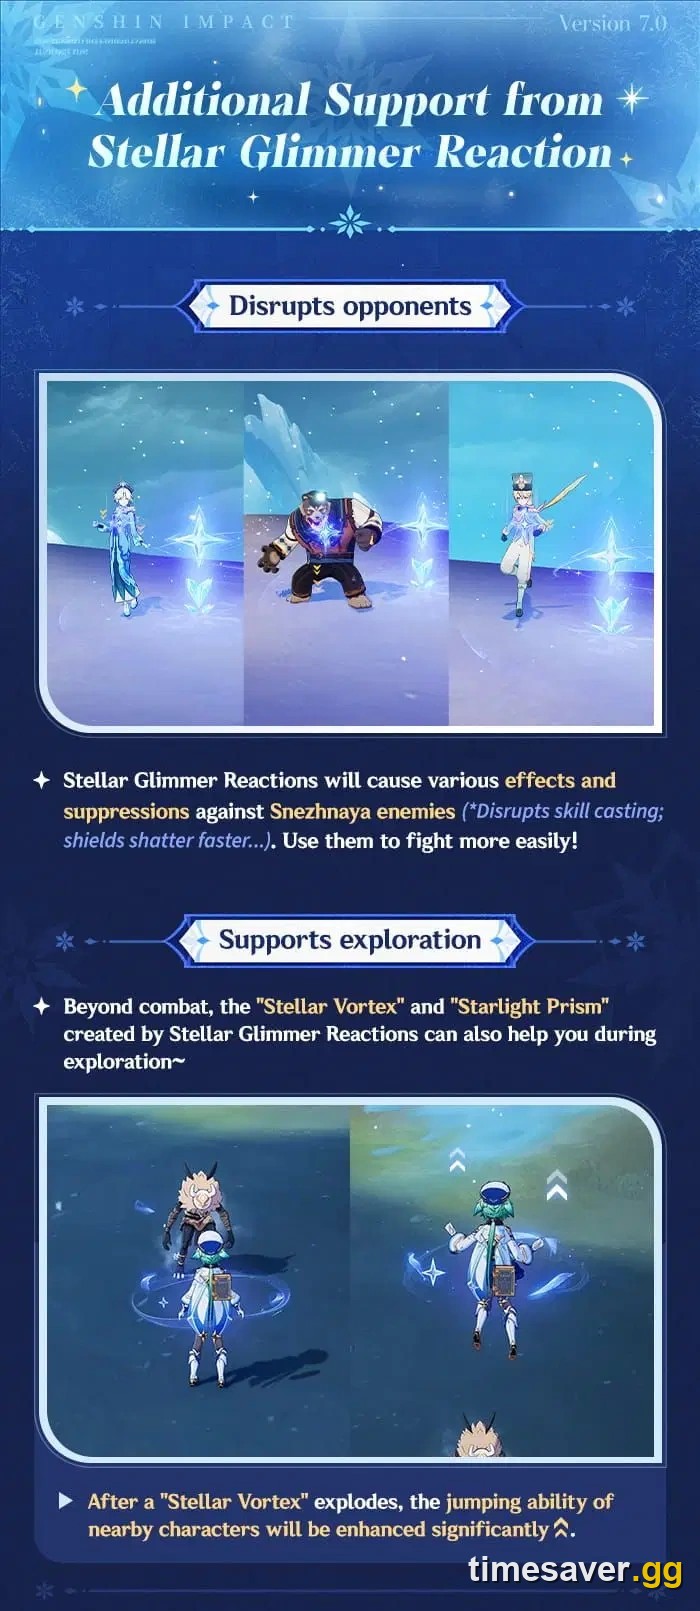
Stellar-Conduct does something no other reaction in the game does: it deals no damage at all. Triggering it spawns a Starlight Prism that lasts 7 seconds and sustains a Polestar Field around itself. Everything Stellar-Conduct gives you is delivered through that field.
Inside the field, the game counts Cryo and Electro element-applying hits landed on opponents, and converts that count into two scaling buffs. Two details trip people up constantly:
- The hit that created the Prism does not count. Your counter starts from the next application, not the trigger.
- The count resets every 4 seconds, and the buffs it grants also last 4 seconds. This is a rolling window, not a stack you build and hold for the Prism's full duration.
The scaling itself, from the reaction's own data table:
| Hits recorded | Reaction coefficient | DMG Bonus |
|---|---|---|
| 0 | 1 | 20% |
| 1 | 1.45 | 29% |
| 2 | 1.5 | 30% |
| 6 | 1.7 | 34% |
| 12 (max) | 2 | 40% |
The jump from 0 hits to 1 is the biggest step in the table — coefficient 1 to 1.45, DMG Bonus 20% to 29%. After that it is a flat +0.05 coefficient and +1% DMG Bonus per hit, capping at 12. So a team that lands even one extra Cryo or Electro application inside the window captures most of the value; grinding toward 12 hits is refinement, not a requirement.
On top of that, the Polestar Field applies a flat 40% Physical RES reduction to enemies inside it, at every hit count including zero. It does not scale and needs no setup. For a Physical carry, that shred alone can beat the entire elemental side of the reaction.
Stellar-Conduct also has open-world behaviours that have nothing to do with combat damage:
- Characters inside a Polestar Field do not lose heat, and do not lose Kresnik Energy. If Kresnik Energy is already below 30%, it is restored to 30%.
- Prime Ice Constructs and firearms receive buffs while inside the field.
- Out of combat, an expired Prism leaves behind a Prism Mirage, which can be reactivated and then lasts indefinitely with Prime Ice Construct properties, subject to the usual placement limits.
That last one is the quiet exploration answer to "what is Stellar-Conduct for": a portable, permanent warmth-and-energy station in the coldest region in the game.
When Stellar-Conduct does produce damage numbers, it is never from the reaction itself — it comes from Talents and Constellations that reference the reaction, dealt as either Cryo or Electro. Beidou's sixth Constellation is named "Radiance: Stellar-Conduct," and Version 7.1 shipped a fix for its Elemental Mastery failing to apply.
What does Stellar Swirl actually do in Version 7.1?
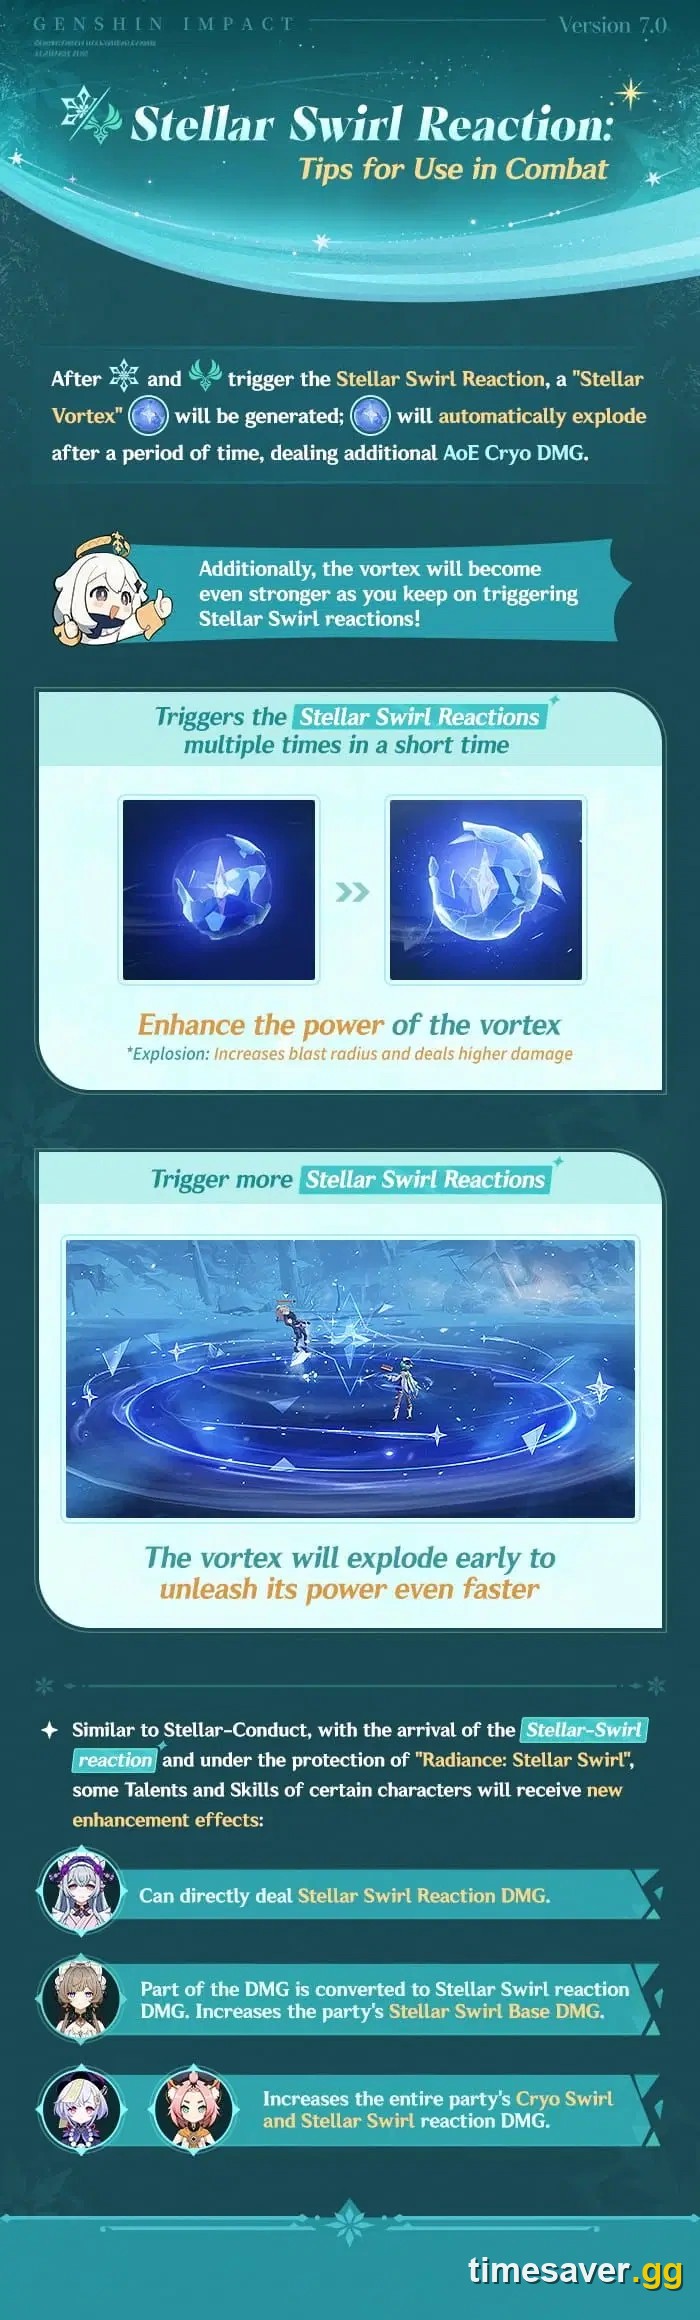
Stellar Swirl is the opposite design. It is a damage reaction with a small escalation mechanic bolted on.
Trigger it and two things happen. First, an instance of Anemo DMG hits the target. Second, a Stellar Vortex at Lv. 1 spawns and lasts 3 seconds, then detonates after a short delay for AoE Cryo DMG.
The escalation runs on trigger count, not on time:
- On the third Stellar Swirl trigger, the Vortex upgrades to Lv. 2, which deals greater damage over a wider area.
- Three more triggers after that detonate the Vortex immediately rather than waiting out its delay.
- For 5 seconds after a Vortex explodes, the next jump your character makes has increased height.
That jump-height rider reads like a throwaway tooltip line, but it is why Stellar Swirl shows up in Snezhnayan traversal clips — a movement tool attached to a damage reaction.
The practical consequence of the Lv. 2 threshold is that Stellar Swirl wants sustained uptime, not burst. Three triggers to upgrade, three more to get instant detonations — a team that triggers the reaction twice per rotation never sees the good half of the mechanic. This is the single most common way players underrate Stellar Swirl: they test it on a training dummy for eight seconds and never reach Lv. 2.
How much damage do these reactions actually do?
This is where the two diverge hardest — and where sourcing matters. HoYoverse has never published the internal damage formula for Lunar or Stellar Glimmer reactions. The numbers below are community-derived from frame-by-frame testing published on Bilibili. Treat them as a very good approximation, not official figures.
Lunar and Stellar Glimmer reactions share one formula. The Elemental Mastery term is:
%EM Bonus = 6 × EM / (EM + 2000) × 100%
That is a hard-diminishing curve. At 1000 EM you get 200%. Doubling to 2000 EM gets you 300%, not 400% — Stellar Glimmer teams are not the EM-stacking monsters that Dendro teams are.
The base reaction coefficients are the real story:
| Reaction | Base coefficient |
|---|---|
| Stellar Swirl (initial) | 0.75 |
| Stellar Swirl (Vortex Lv. 1) | 2 |
| Stellar Swirl (Vortex Lv. 2) | 3 |
| Lunar-Crystallize | 1.6 |
| Lunar-Charged | 3 |
Stellar-Conduct does not appear on that table because it has no base coefficient — it deals no reaction damage. Stellar Swirl at Vortex Lv. 2 sits at 3, level with Lunar-Charged, the highest in the family. A Stellar Swirl team that reaches Lv. 2 is doing top-tier reaction damage. One that does not is doing a quarter of it.
A further scope rule matters for team-building. Indirect reaction damage — caused by applying an element rather than by a character's attack — exists only for Lunar-Charged, Lunar-Crystallize and Stellar Swirl. Not Lunar-Bloom, and not Stellar-Conduct. Stellar Swirl can tick on its own from element application; Stellar-Conduct cannot.
When indirect Stellar Swirl damage is calculated, the game blends the stat contributions of everyone who participated:
Highest × 0.6 + second × 0.3 + third × 0.05 + fourth × 0.05
If fewer than four characters contributed, the missing entries are simply omitted — the remaining weights are not rescaled upward. That is a real penalty for two-character Stellar Swirl cores, and an argument for a fuller Cryo and Anemo roster. Contributors include Cryo and Anemo appliers, the character who created a Cryo-triggered Freeze aura, and anyone who helped trigger a Stellar Swirl between the initial reaction and the final damage instance.
Whether the blended damage crits is decided by whether the highest individual contribution crit — not an average, and not the triggering character's sheet in isolation.
One more thing if you tested this before the patch: Version 7.1 fixed an issue where "DMG dealt by the Stellar Swirl reaction could occasionally fail to include Cryo characters involved in the reaction in its calculations." Pre-7.1 Stellar Swirl damage tests should be thrown out.
Which characters enable Stellar Glimmer reactions?
Enabling a Stellar Glimmer reaction requires a Stellar Jubilee Passive. Three are documented and categorised right now:
- Odette — Dance of Aurore. 0.7% Base DMG per 100 ATK, capped at 14%.
- Sandrone — Light of Rationalisme. 0.7% Base DMG per 100 ATK, capped at 14%.
- Traveler (Cryo) — Illusory Frostmirror. 0.35% Base DMG per 100 ATK, capped at 7% — exactly half of the other two.
The Cryo Traveler at half rate is the practical note that matters. The free option genuinely enables the mechanic and is a legitimate way to try Stellar Glimmer teams without pulling — at a straight 7% damage loss against Odette or Sandrone at the same ATK.
All three passives grant the same state riders: "Radiance: Stellar-Conduct" inside a Polestar Field, and "Radiance: Stellar Swirl" for 8 seconds after a nearby party member triggers a Stellar Swirl. Several 7.1 weapons key off those states directly.
One open question is worth flagging rather than smoothing over. The enabling mechanic is tied to Stellar Linchpins, Vision-like objects from Snezhnaya. The wiki states flatly that "all playable Stellar Linchpin users have Stellar Jubilee Passives that enable Stellar Glimmer Reactions," and lists five known users: Sandrone, Odette, Vesna, Danica and Mitya. Only three have a categorised Stellar Jubilee Passive documented so far.
For Vesna, first-party sourcing is clear even though community documentation is catching up. Her 7.1 announcement entry calls her "an Anemo DMG dealer who enables her party to trigger Stellar Swirl reactions and, under certain conditions, can also deal Stellar Swirl DMG herself." She carries a Stellar Linchpin: Anemo rather than a Vision and released 23 September 2026 at 11:00 GMT+8. Treat her enabler status as HoYoverse-confirmed and her exact passive numbers as not yet publicly pinned down — our Vesna build guide tracks the kit as it firms up.
The other banner character, Vodyanitsa, is a Hydro Catalyst user described in the same announcement as "capable of providing both healing and support, making her well-suited to both Freeze and Stellar Swirl teams." She supports the mechanic, she does not enable it — worth being precise about if you are deciding which of the two banners to pull. Her kit is broken down in our Vodyanitsa build guide.
Stellar-Conduct vs Stellar Swirl: which should you build around right now?
Put the two side by side and the roles are cleanly separated:
| Attribute | Stellar-Conduct | Stellar Swirl |
|---|---|---|
| Triggered by | Cryo + Electro | Anemo + Cryo |
| Introduced in | Luna VIII | Version 7.0 |
| Reaction damage | None | Yes, coefficient 0.75 / 2 / 3 |
| Indirect damage | No | Yes |
| Core effect | 7s Starlight Prism, Polestar Field | Anemo hit plus Cryo Vortex detonation |
| Signature number | 40% Physical RES shred | Vortex Lv. 2 at the 3rd trigger |
| Wants | Hit frequency inside a 4s window | Sustained trigger count |
| Open-world use | Heat and Kresnik Energy retention, Prism Mirage | Jump height for 5s after detonation |
Build Stellar-Conduct if your damage comes from somewhere other than reactions — a Physical carry that wants the 40% RES shred, or a Cryo and Electro core that can machine-gun applications inside the rolling 4-second window. It is a force multiplier, not a damage source, and the better pick for extended Snezhnaya exploration on the heat and Kresnik Energy retention alone.
Build Stellar Swirl if you want the reaction itself to be a meaningful share of your damage and your rotation is long enough to reach Vortex Lv. 2. It is the more forward-looking option: 7.1 gave it a dedicated 5-star Anemo enabler in Vesna, a Hydro support in Vodyanitsa, and an unusual amount of weapon support.
The 7.1 weapon list makes the direction obvious. Beyond the Chrysalis (5-star Sword) cycles CRIT DMG, Stellar Swirl DMG and Energy. Hymn of the Maelstrom (5-star Catalyst) is enhanced after a nearby member triggers Frozen or Stellar Swirl. New Bough (4-star Sword) grants ATK and Stellar Glimmer reaction DMG in the Radiance: Stellar Glimmer state. Breezeborne Refrain (4-star Bow) gives party-wide Stellar Glimmer reaction DMG. Winter's Heavy Heart (4-star Catalyst) scales off the number of Cryo and Electro characters — the one clear nod to Stellar-Conduct.
Then there is the Abyss. The upcoming Spiral Abyss rotation goes live on 16 October 2026, tuned for this family with unusual directness:
- Floor 11 Ley Line Disorder: all characters gain +60% Anemo DMG Bonus; all party members gain +60% Cryo DMG Bonus.
- Floor 12, first half: "Characters' Stellar Glimmer DMG increased by 75%."
- Floor 12, second half: all party members gain +75% Cryo DMG Bonus.
The Blessing of the Abyssal Moon for that rotation, "Stardread Moon," covers both halves of the family: triggering Superconduct, Stellar-Conduct, Cryo Swirl, Stellar Swirl, Frozen or Shatter — or dealing Stellar-Conduct or Stellar Swirl damage — unleashes a shockwave dealing True DMG, once every 2 seconds. If you have been putting off building into Stellar Glimmer, that Floor 12 first-half modifier is the deadline. Our Floor 12 guide tracks the lineup as it rotates.
One last argument for keeping both available: 7.1's new field enemy, the Guardian Blade of Drifting Snow on Fellfrost Peak, uses ice coffins, and the announcement is explicit — "Ice coffins can become fragile from Stellar Glimmer reactions. When this happens, they are especially vulnerable to Electro and Anemo attacks." Either reaction opens the coffin, and the follow-up wants exactly the two elements that trigger them. 7.1 also fixed Pyro and Geo attacks breaking Glaciomancer and Glacial Warden ice coffins at an abnormal rate after Stellar Glimmer exposure, so the intended interaction is now the reliable one.
FAQ
Is Stellar-Conduct or Stellar Swirl better in Genshin Impact 7.1? Neither is strictly better because you do not choose between them. Stellar-Conduct is what Superconduct becomes with a Stellar Jubilee Passive in the party, and Stellar Swirl is what Cryo Swirl becomes. For raw reaction damage, Stellar Swirl wins outright — Stellar-Conduct deals none. For buffing a non-reaction carry, Stellar-Conduct wins, mostly on its flat 40% Physical RES reduction.
Can one team run both Stellar-Conduct and Stellar Swirl? Yes. The same passive converts both, so a party with Cryo, Electro and Anemo characters alongside an enabler will produce both reactions depending on which elements land together. Version 7.1's Stardread Moon Abyss blessing explicitly rewards both, so there is no penalty for mixing during that rotation.
Do I need a 5-star character to trigger Stellar Glimmer reactions? No. The Cryo Traveler's Illusory Frostmirror passive enables both reactions for free. It grants 0.35% Base DMG per 100 ATK up to 7%, which is exactly half of what Odette's and Sandrone's passives give, so it is a real damage loss — but the mechanic itself works fully.
How many times do I need to trigger Stellar Swirl to reach Vortex Lv. 2? Three. The Stellar Vortex upgrades to Lv. 2 on the third Stellar Swirl trigger, gaining greater damage and a wider area. Three further triggers after that cause the Vortex to detonate immediately instead of after its usual delay.
Does the hit that creates a Starlight Prism count toward the Polestar Field buff? No. The initial hit that spawned the Prism is excluded from the recorded count. On top of that, the count resets every 4 seconds and the buffs it grants last 4 seconds, so it is a rolling window rather than a stack you accumulate over the Prism's full 7-second duration.
Is the Stellar Glimmer damage formula official? No. HoYoverse has not published it. The Elemental Mastery term of 6 × EM / (EM + 2000) and the base coefficients of 0.75, 2 and 3 for Stellar Swirl come from community frame-testing. They are the accepted working model, but they are not first-party figures and should be treated accordingly.
Did anything change about these reactions in Version 7.1? Yes, and it matters for anyone who tested earlier. Version 7.1 fixed a bug where Stellar Swirl damage could fail to include Cryo characters involved in the reaction in its calculations, and fixed Beidou's Constellation 6 "Radiance: Stellar-Conduct" Elemental Mastery failing to take effect. It also stopped players liking Prime Ice Constructs, activating or removing a Starlight Prism, or opening Storage Devices during combat.
Which Version 7.1 weapons support Stellar Swirl? Beyond the Chrysalis (5-star Sword) cycles CRIT DMG, Stellar Swirl DMG and Energy. Hymn of the Maelstrom (5-star Catalyst) enhances after a nearby member triggers Frozen or Stellar Swirl. New Bough (4-star Sword) and Breezeborne Refrain (4-star Bow) both grant Stellar Glimmer reaction DMG. Winter's Heavy Heart (4-star Catalyst) is the Stellar-Conduct-leaning option, scaling off the number of Cryo and Electro characters in the party.
Sources and version notes
Reaction mechanics, coefficient tables and talent text were pulled from the Genshin Impact Wiki entries for Stellar Glimmer Reaction, Stellar-Conduct, Stellar Swirl, Stellar Linchpin and Damage on 24 September 2026. Character details, weapon effects, Spiral Abyss modifiers, enemy behaviour and bug fixes come from the official in-game announcements "A Rekviem for the Underworld" Version 7.1 Update Details and Version Details, both live on the global announcement feed at time of writing. The Elemental Mastery formula and damage coefficients are community-derived from published frame testing and are labelled as such above. Version 7.1 went live on 23 September 2026; the Spiral Abyss rotation described here goes live on 16 October 2026.
More Genshin Impact guides